Skip to content

MinuteView Server Installation


This guide walks you through installing and configuring MinuteView Server on a Windows Server environment using IIS.


1. Prerequisites

Before beginning installation, ensure the following components are installed and configured.

1.1 Hardware Requirements

ComponentMinimumRecommended
CPU4-core processor8-core processor or better
RAM8 GB16 GB
Available disk space100 GB200 GB or more
Network1 Gbps LAN1 Gbps LAN

Running MinuteView Automations on the same server?

If you plan to run MinuteView Automations on the same machine, increase the recommended RAM to 32 GB. Automation workers process tasks concurrently and benefit significantly from additional memory — particularly if integrations such as Elasticsearch, Autodesk ACC, or SharePoint are in use.


1.2 Operating System

Version
MinimumWindows Server 2019
RecommendedWindows Server 2022 or Windows Server 2025

Windows Server 2016

Windows Server 2016 has reached end-of-mainstream-support and is no longer a supported target for MinuteView. Installations on Windows Server 2016 are not tested and are not recommended.


1.3 Internet Information Services (IIS)

MinuteView is installed as an application within the Default Web Site in IIS.

Ensure:

  • IIS is installed
  • Default Web Site is running
  • ASP.NET features are enabled
  • .NET Hosting Bundle (if required by your version)

1.4 SQL Server

A Microsoft SQL Server instance must already be installed.

Version
MinimumSQL Server 2019
RecommendedSQL Server 2022 or SQL Server 2025

Supported editions:

  • SQL Server Express (suitable for smaller deployments; default instance is acceptable)
  • SQL Server Standard
  • SQL Server Enterprise

You will require:

  • SQL Server name (e.g., localhost\SQLEXPRESS)
  • SQL Authentication enabled
  • A SQL user with full administrative rights (for initialization phase)

1.5 Network Requirements

MinuteView Server communicates with the following external endpoint:

HostPurpose
licensing.tentechportal.comLicense validation and basic product telemetry

Firewall configuration: Outbound HTTPS (port 443) to licensing.tentechportal.com must be permitted from the server running MinuteView.

What data is transmitted?

MinuteView sends basic, non-identifiable telemetry to licensing.tentechportal.com — for example, which features are active and software version in use. No user data, personal information, or identifiable content is ever transmitted. This connection is also used to validate your license on startup.

If your environment does not permit outbound internet access, contact Tentech to discuss offline licensing options.


2. Installing MinuteView Server

Step 2.1 – Obtain Installation Media

You will be provided with the MinuteView installation media directly by Tentech.

Step 2.2 – Run Installer

  1. Launch the installation media
  2. Follow the installation wizard
  3. The installer will deploy MinuteView into IIS under the Default Web Site

Installation Location

After installation, files will be located at:

C:\Program Files (x86)\Tentech\MinuteView Server

3. Accessing the Setup Wizard

Once installation is complete:

  1. Open a browser on the server
  2. Navigate to:
http://localhost/MinuteView

You will be automatically redirected to the Initial Setup Wizard.

The first launch will guide you through a 9-step configuration process.


4. Initial Setup Wizard

The setup wizard walks you through all critical configuration steps needed to get MinuteView operational.


Step 1 – License Activation

License Activation

4.1.1 Generate Machine Fingerprint

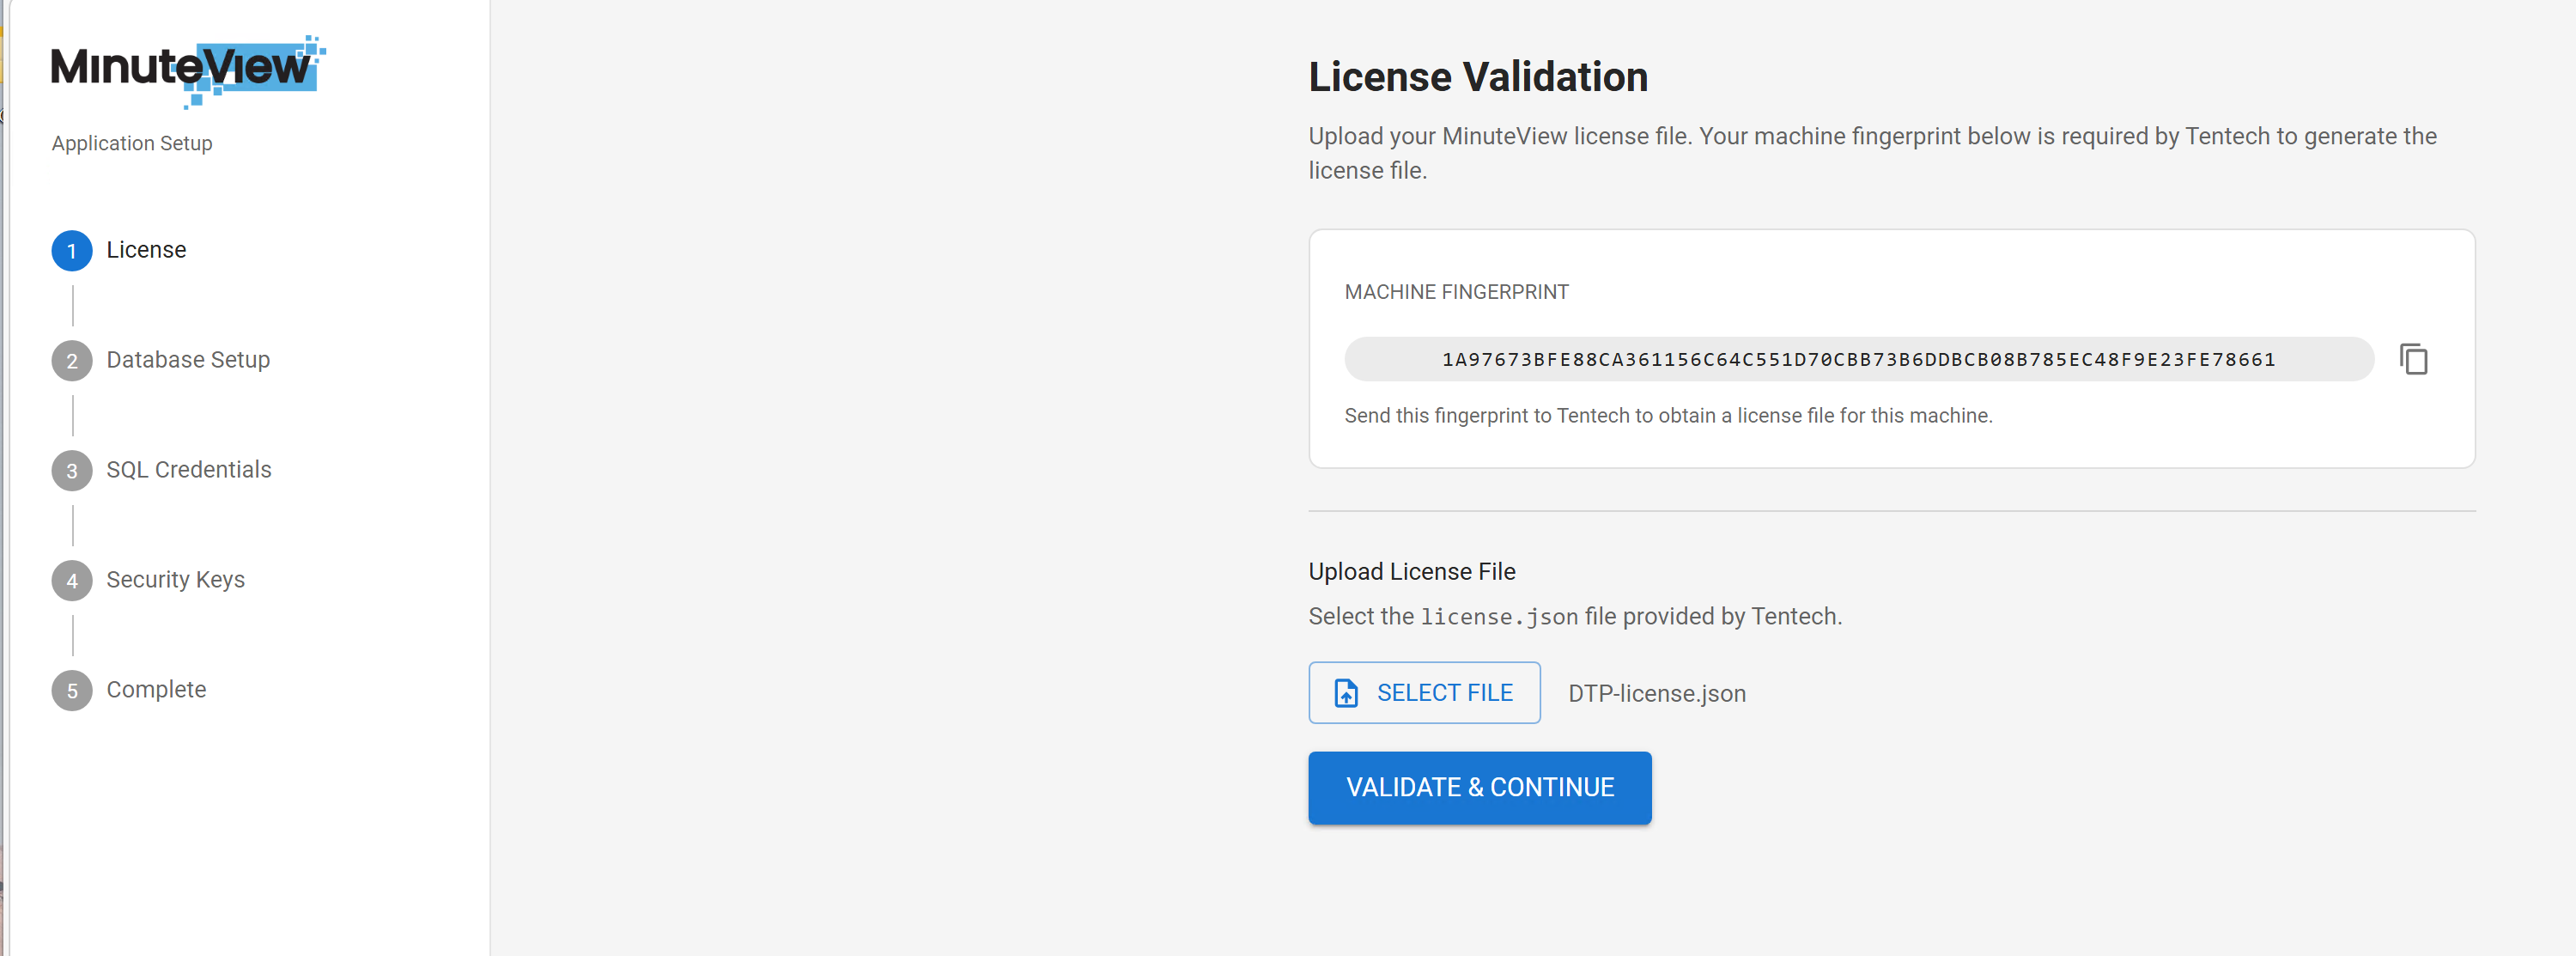
During setup, the system will display a Machine Fingerprint.

  1. Copy this fingerprint
  2. Send it to Tentech
  3. Tentech will generate your license file

4.1.2 Apply License

  1. Upload the provided license file
  2. Select Accept & Validate
  3. Continue once validation is successful

Step 2 – Database Initialization

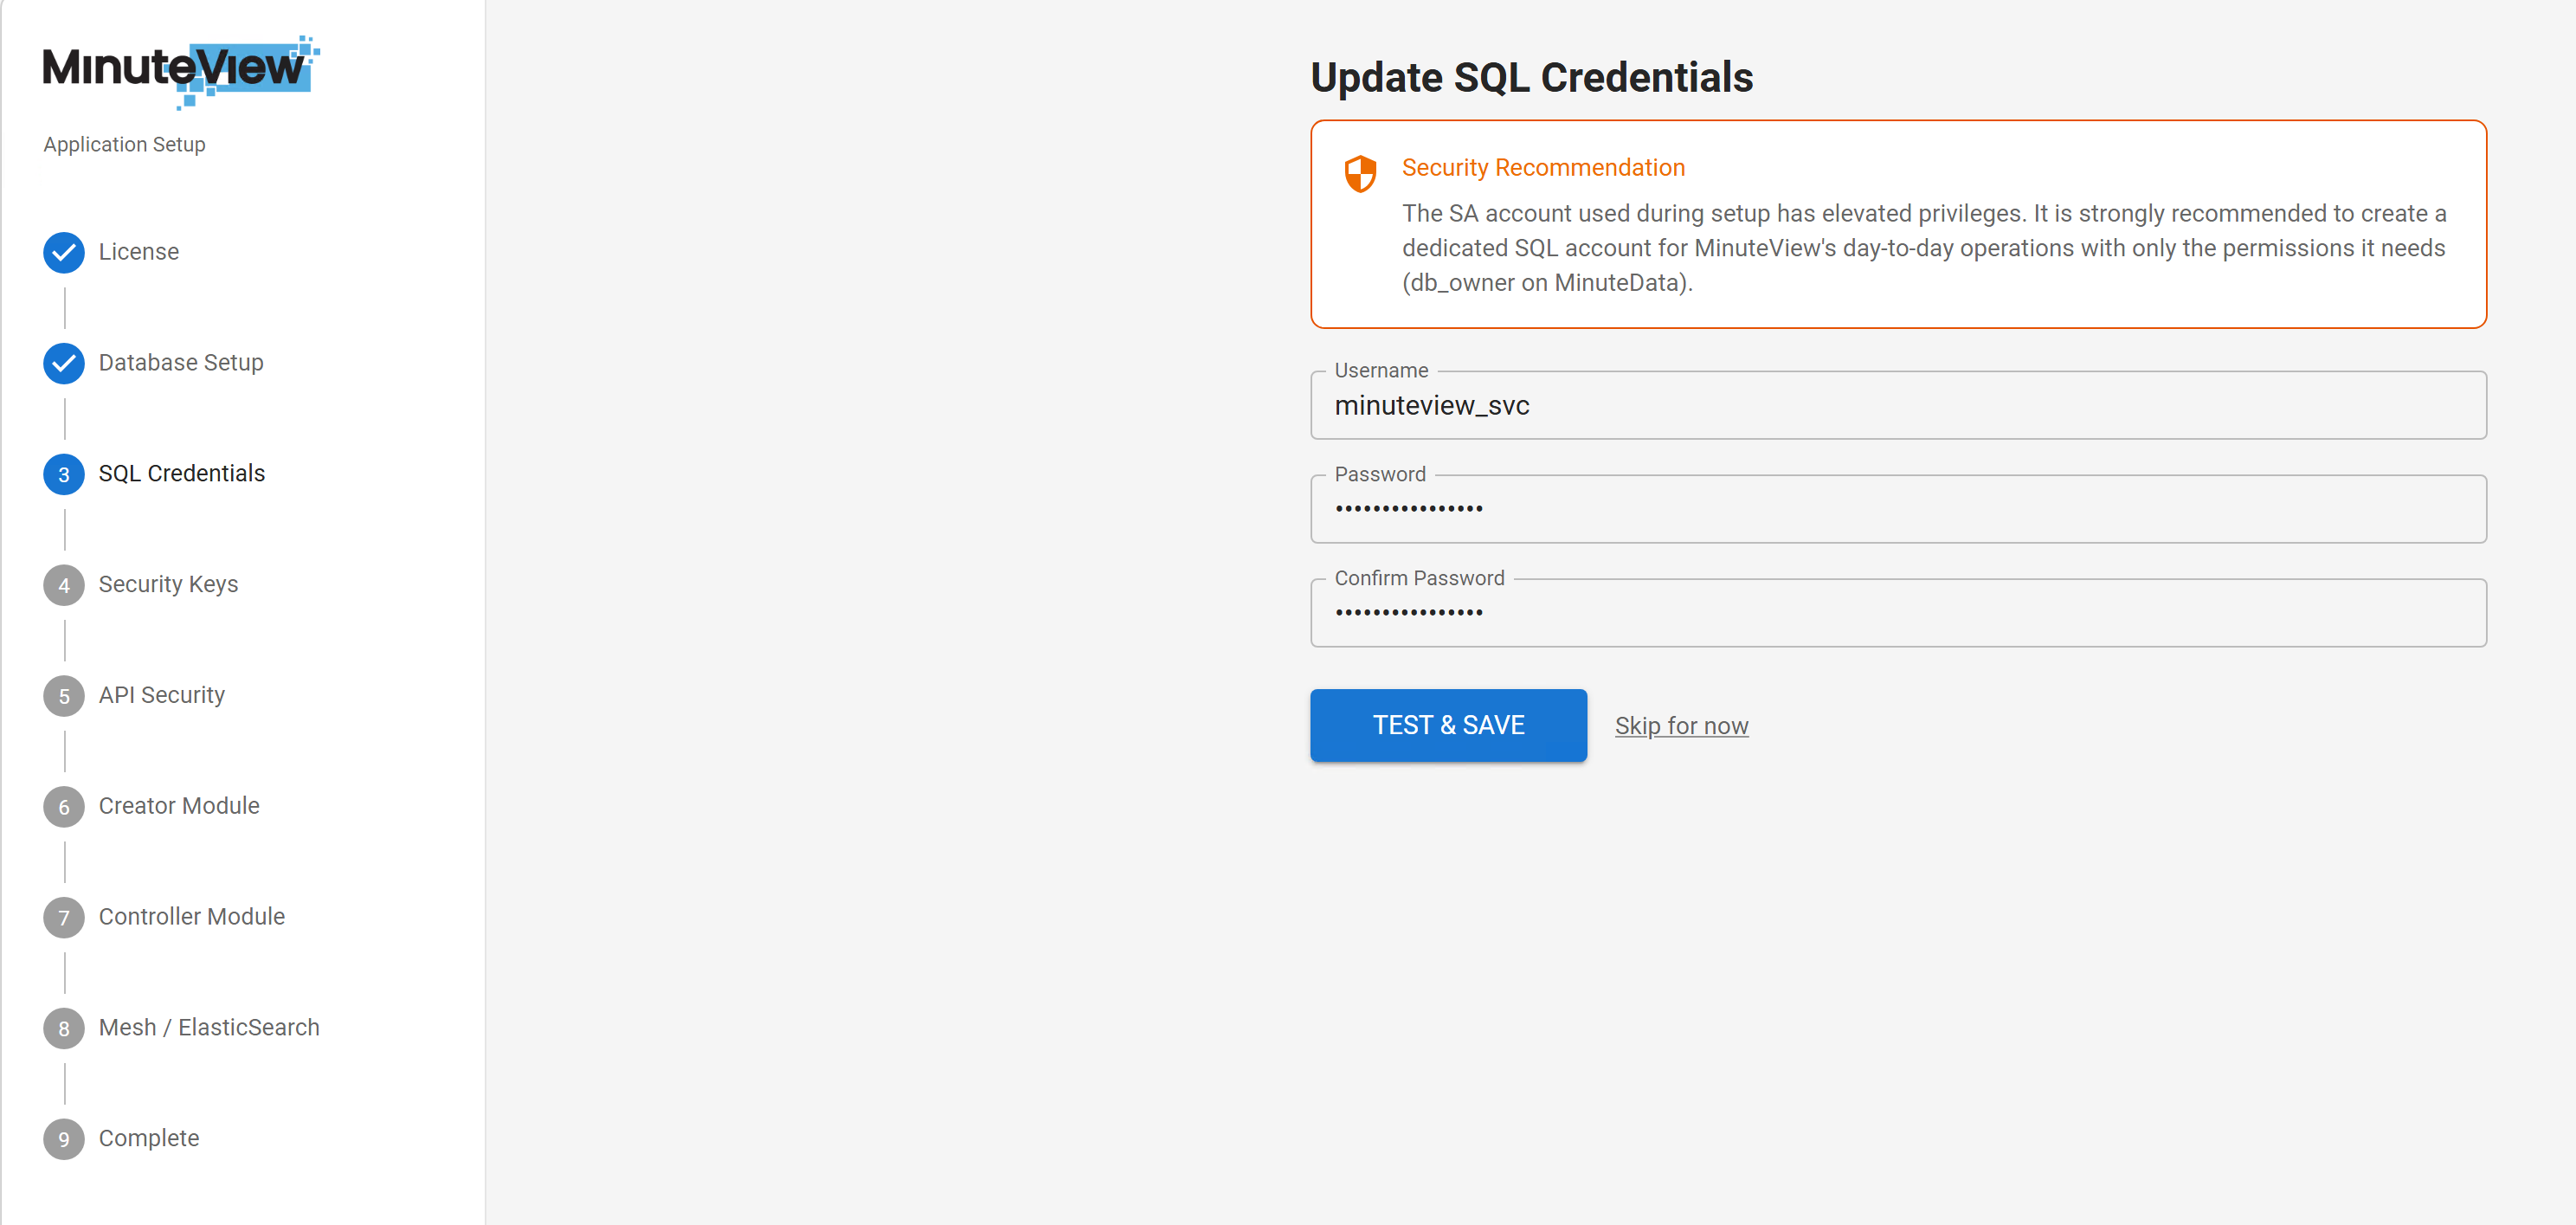
MinuteView requires a SQL database.

4.2.1 SQL Requirements

You must provide:

  • SQL Server name
  • SQL username
  • SQL password

The SQL account must:

  • Have full administrative permissions
  • Be able to create databases
  • Create tables and populate schema

Recommended Approach

Temporarily enable the sa account and set a secure password for initialization.

4.2.2 Initialize Database

  1. Enter SQL connection details
  2. Test connection
  3. Run Initialize Database

This will:

  • Create the MinuteView database
  • Create all tables
  • Populate initial schema and configuration data

Step 3 – Update SQL Credentials (Security Hardening)

Update SQL Credentials

After successful initialization:

  1. Create a new SQL login with:
    • Read/Write access
    • Permissions limited to the MinuteView database
  2. Enter the new credentials into the configuration

At this point:

  • The sa account is no longer required
  • It is recommended to disable sa for security reasons

Step 4 – Encryption Key Configuration

Encryption Keys

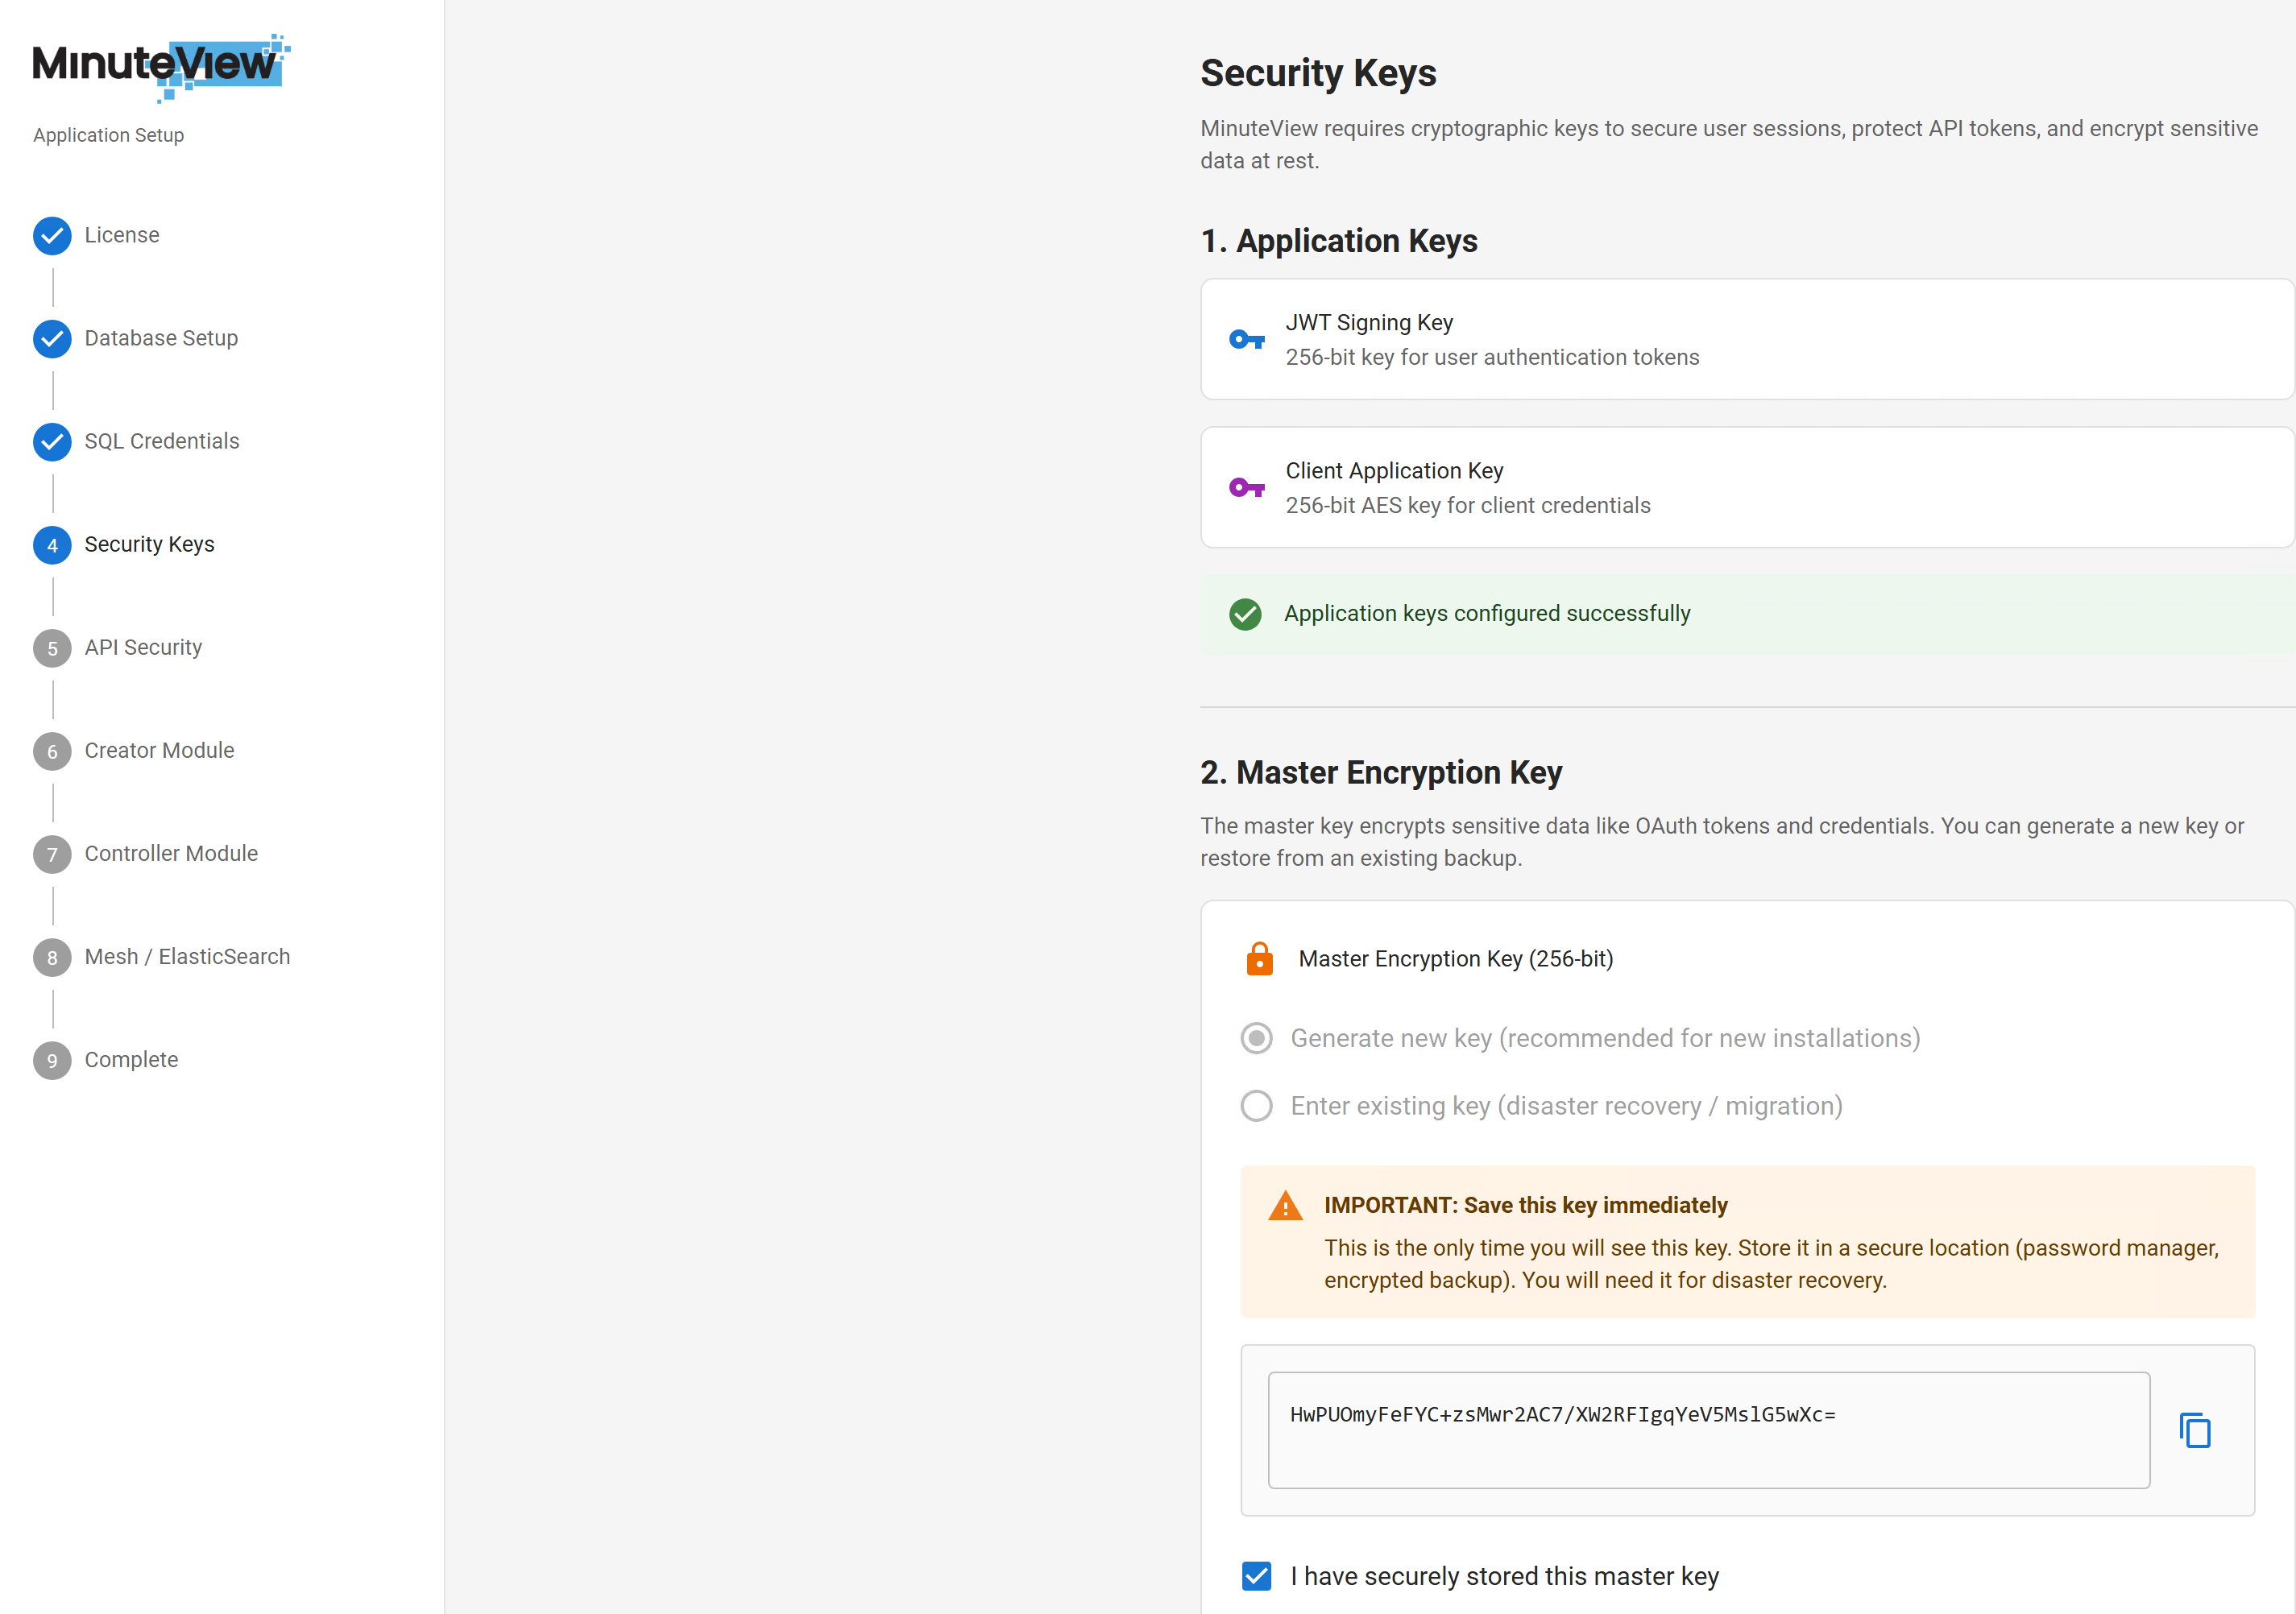
MinuteView uses multiple encryption keys.

4.4.1 Automatically Generated Keys

The following keys are automatically generated:

  • JWT Signing Key
  • Client Application Key

These are used for:

  • Token generation
  • Authentication
  • Secure API communication

4.4.2 Master Encryption Key (Critical)

The Master Encryption Key is used to encrypt sensitive database data.

Critical Information

This key is extremely important.

If you:

  • Restore a backup to a new server
  • Or migrate the database

You must provide the original Master Encryption Key.

Without it:

  • Encrypted data cannot be decrypted
  • Access tokens will become invalid
  • Re-authentication will be required for integrations and automations

Store this key securely.


Step 5 – Enable API

API Settings

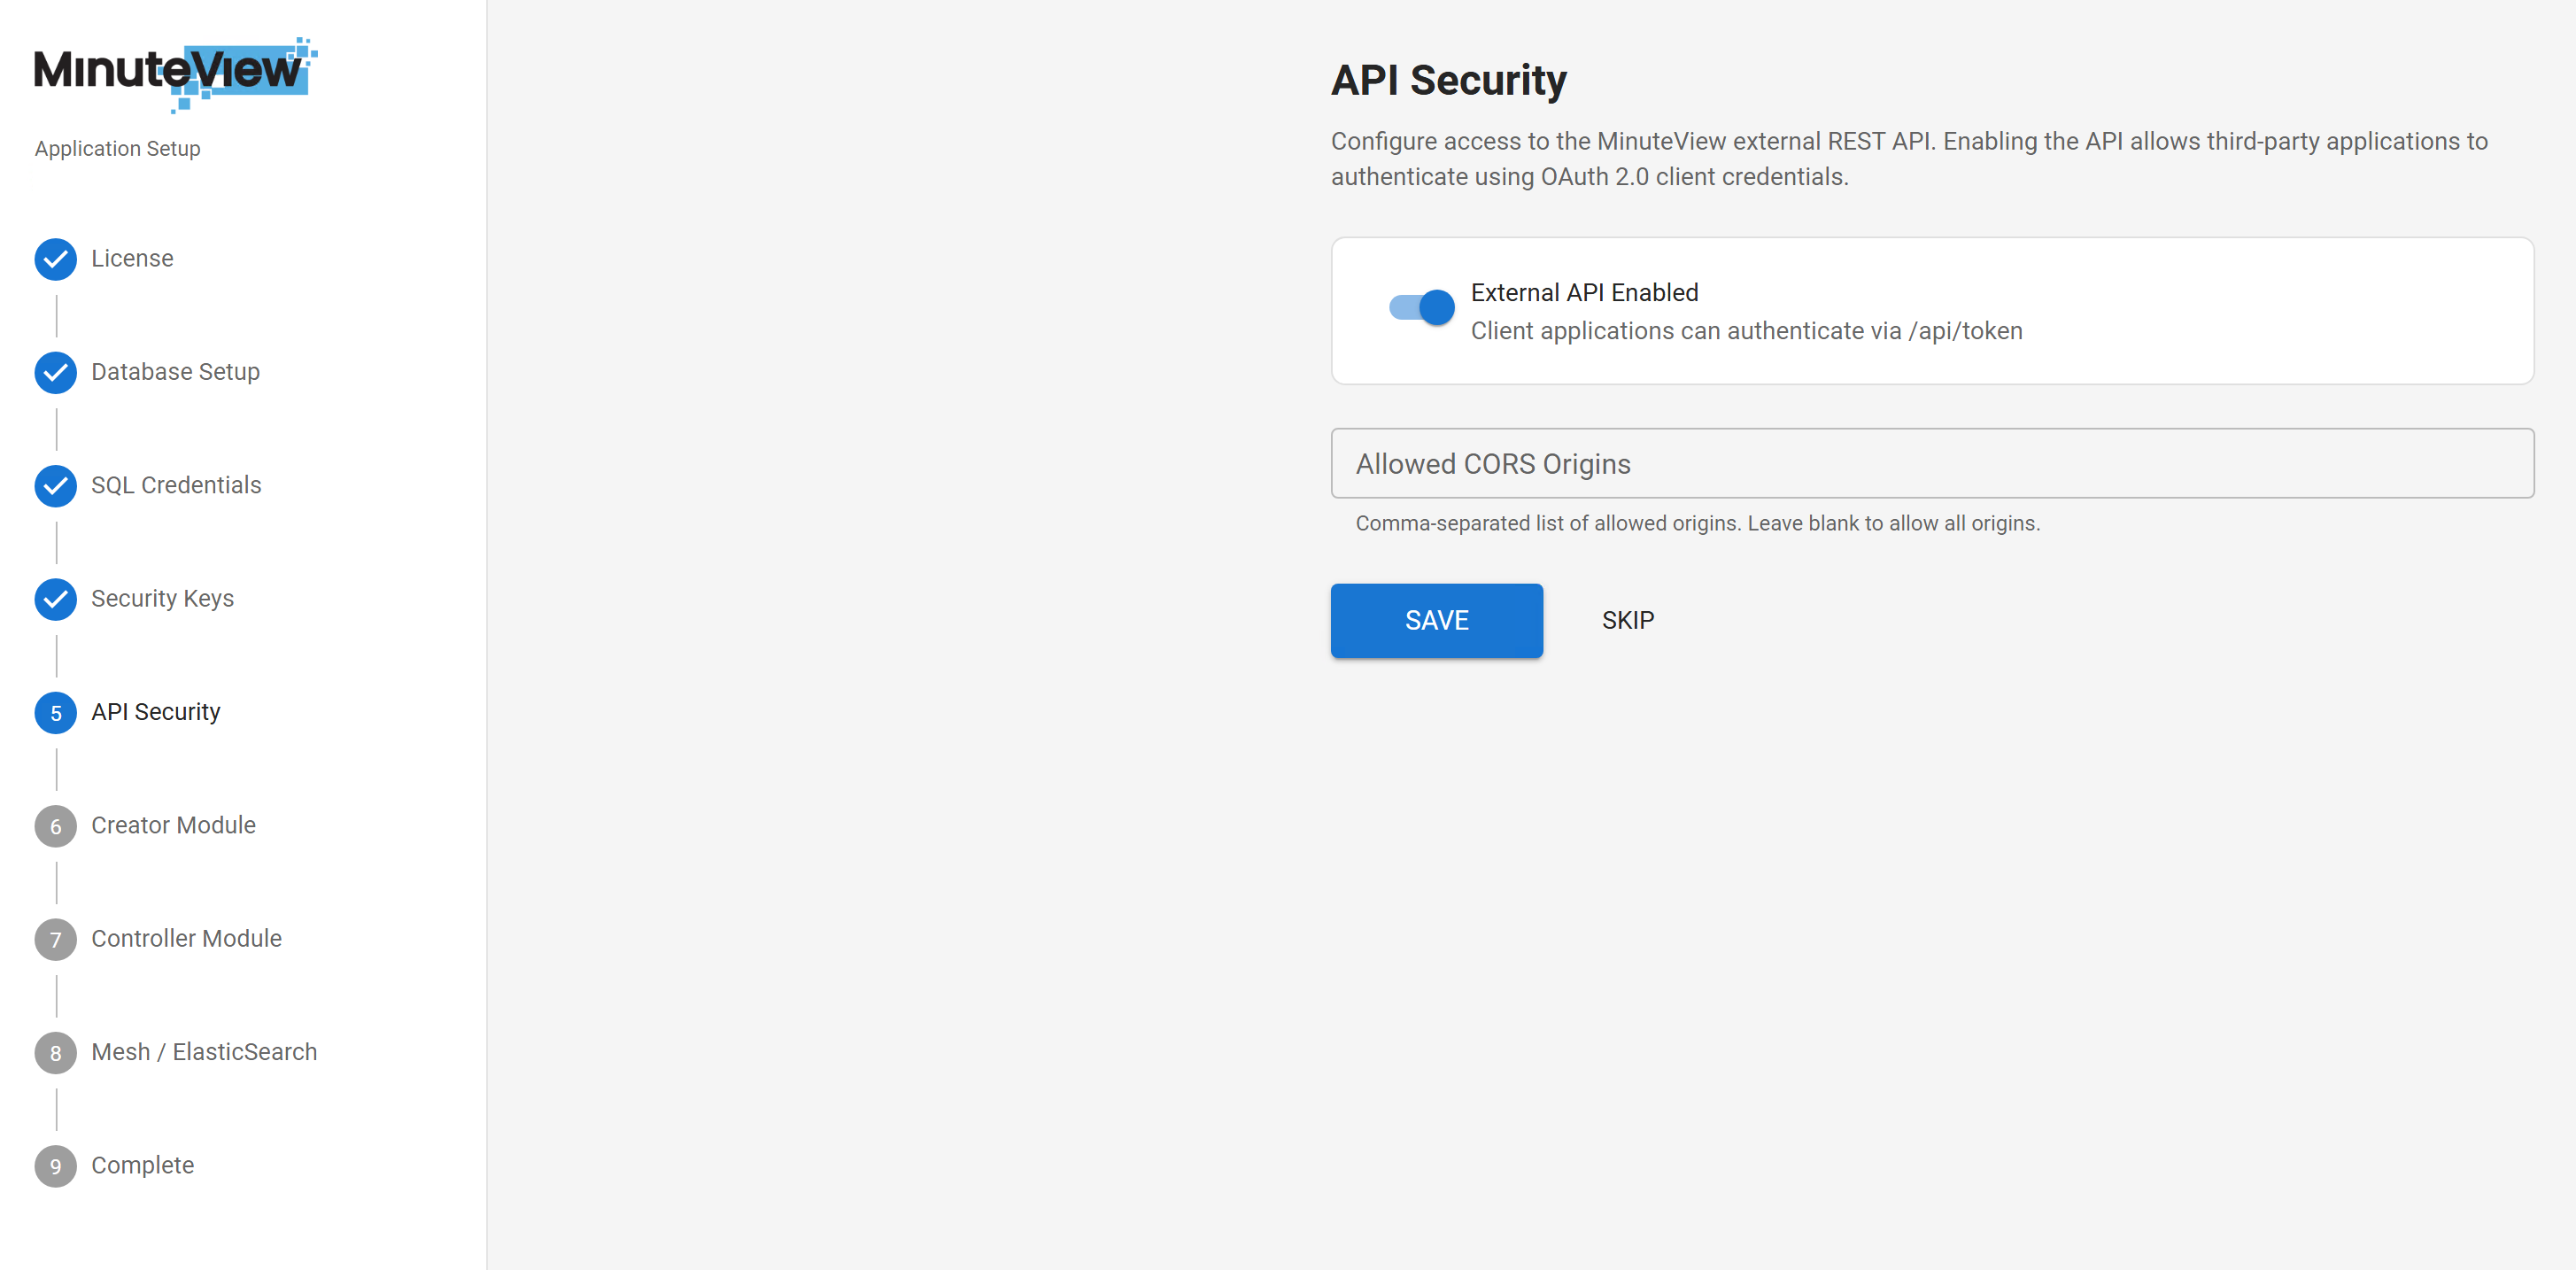
This step enables the internal API framework required for:

  • Automation execution
  • Backend integrations
  • System-to-system communication

Enable this option to activate API endpoints.


Step 6 – Creator Module

Creator Module

This step provides documentation for the Creator module.

No additional setup is required at this stage.

Refer to the Creator documentation for operational guidance.


Step 7 – Controller Module

This step provides documentation for the Controller module.

No setup is required during initial installation.

Refer to Controller documentation for configuration instructions.


Step 8 – Elasticsearch Installation (Optional)

Elasticsearch is optional.

However, it is required for:

  • Mesh module
  • Enterprise search
  • Indexing and search capabilities

If you do not require Mesh, this step may be skipped.


4.8.1 Important Notes About Browser-Based Installation

Because Elasticsearch installation may involve:

  • Extracting packages
  • Registering Windows services
  • Starting services

The browser may not have sufficient permissions to complete all actions automatically.

This is expected.

The wizard will guide you step-by-step through:

  1. Extracting Elasticsearch package
  2. Installing Elasticsearch as a Windows Service
  3. Starting the service via Windows Services
  4. Configuring admin credentials
  5. Creating a MinuteView service account for Elasticsearch access

4.8.2 Extract Elasticsearch

Extract Elasticsearch

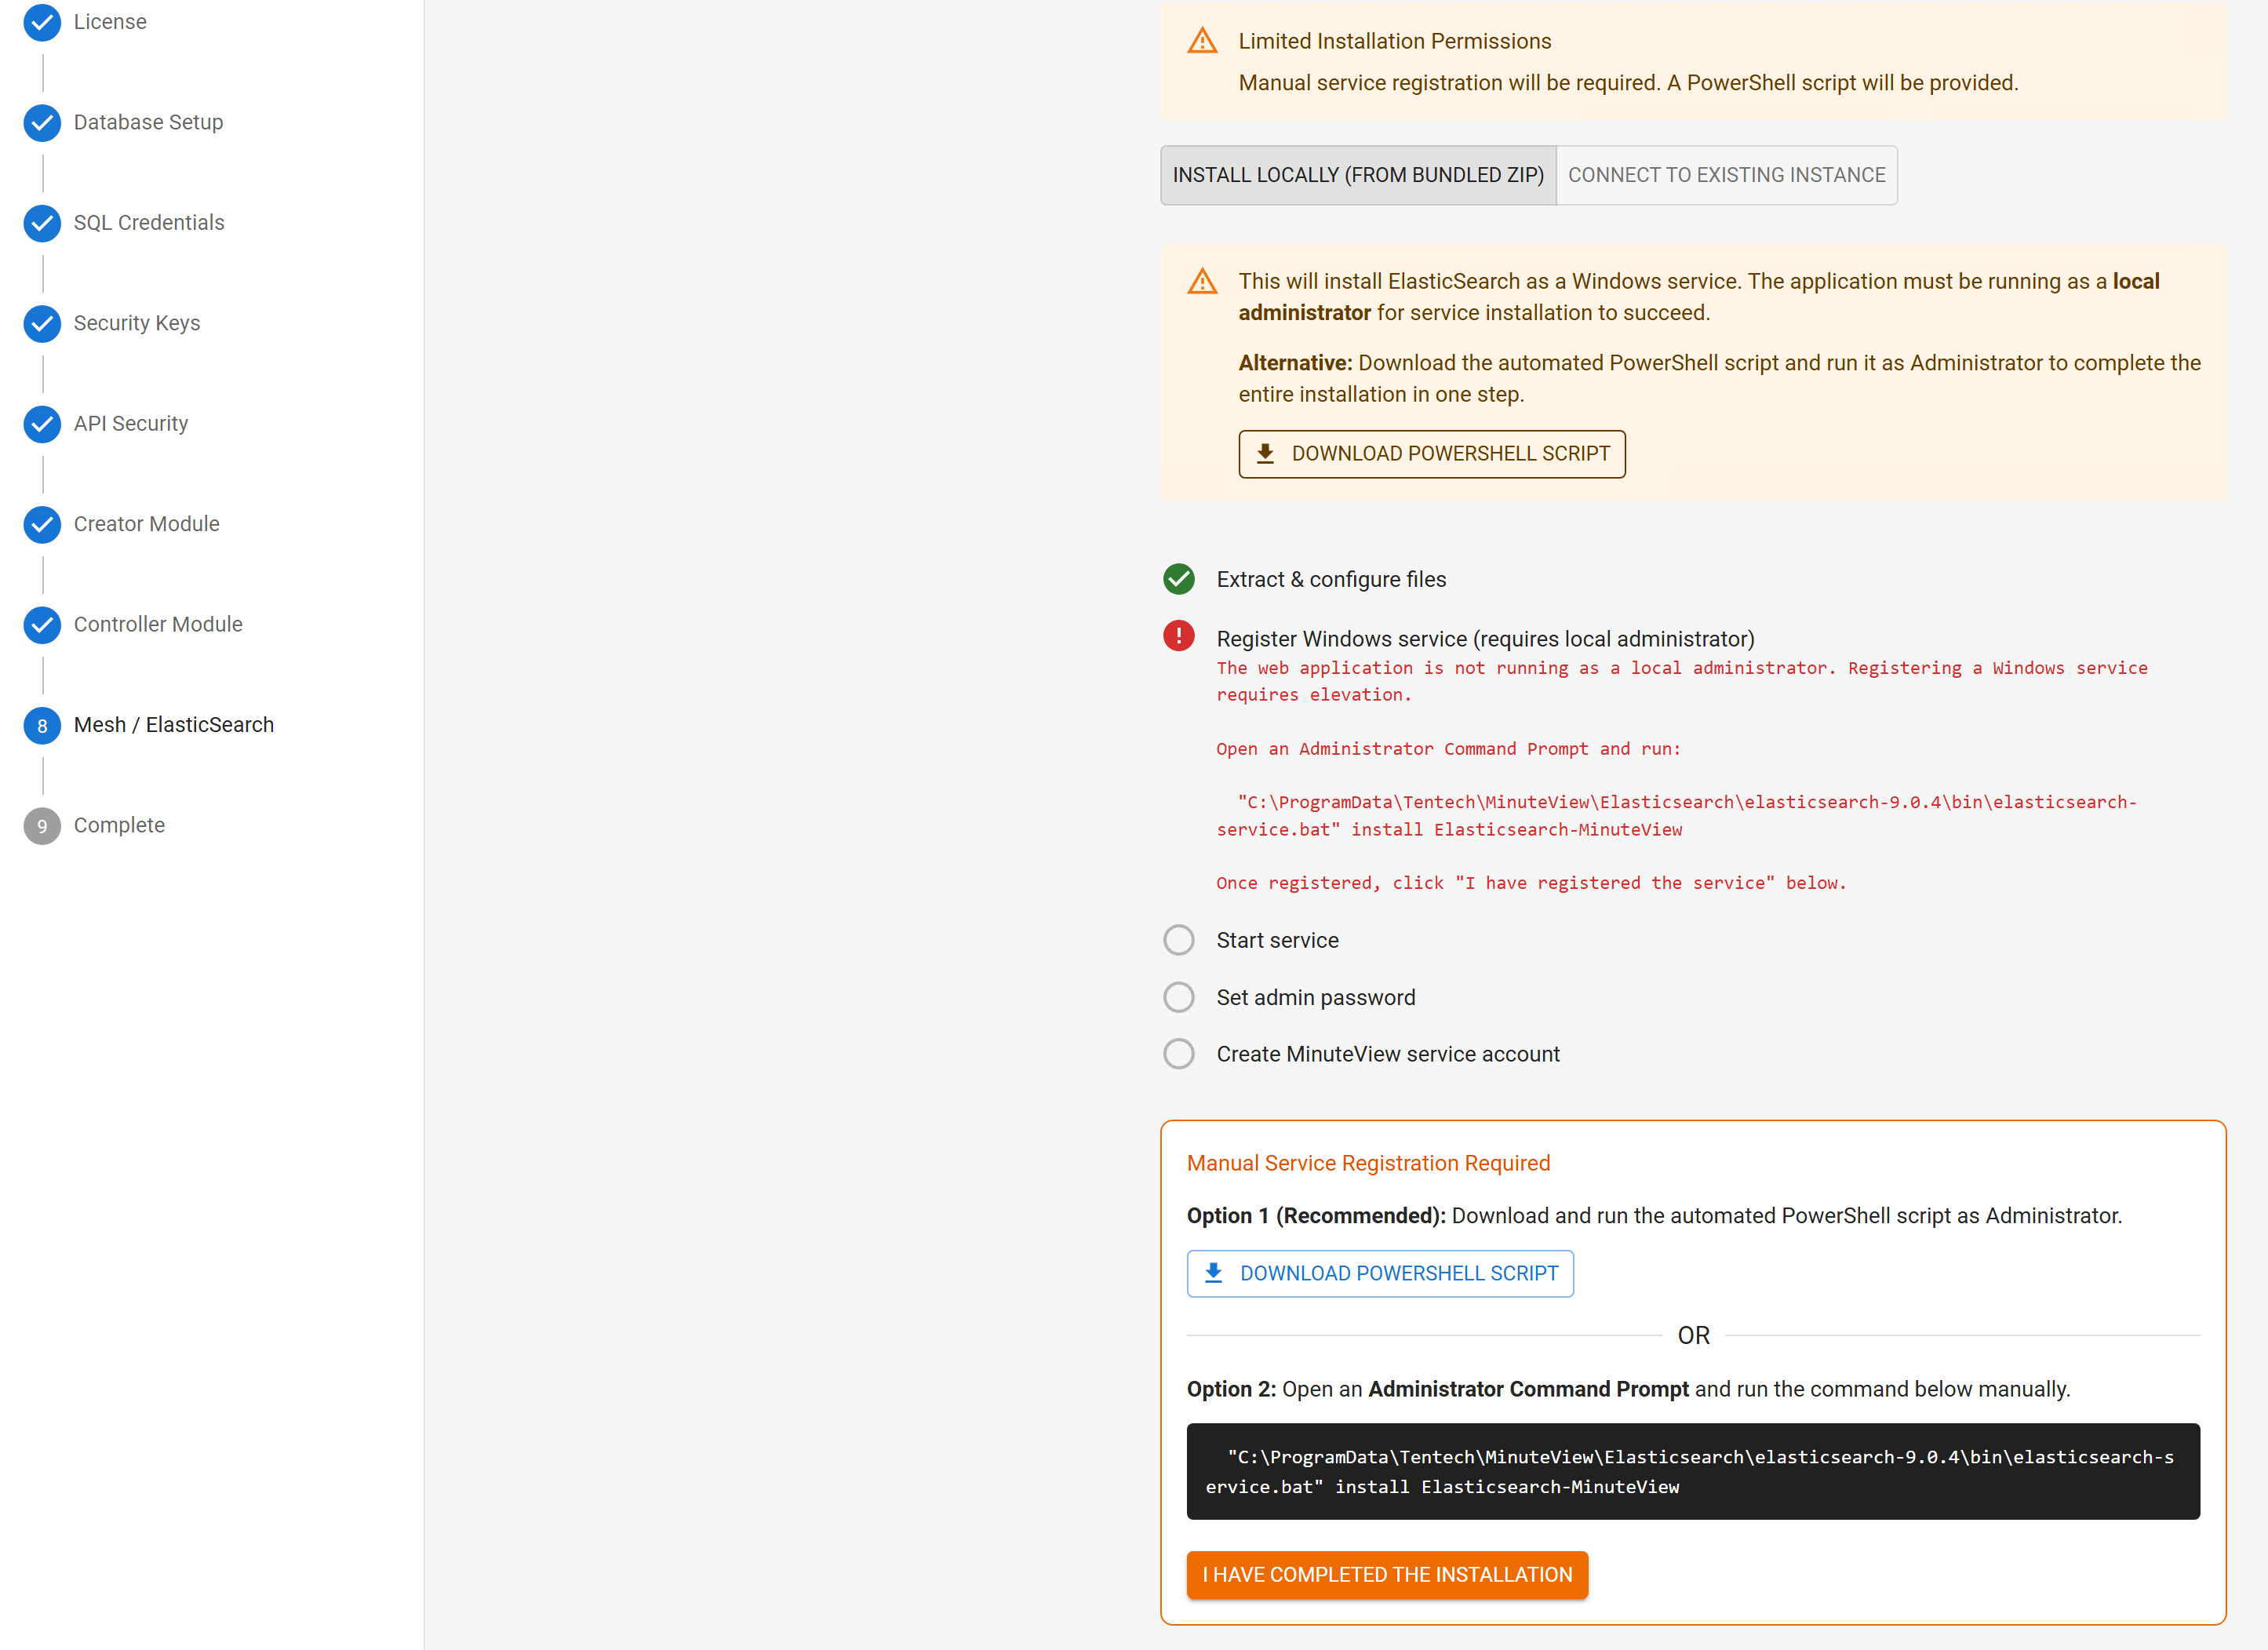
The wizard will guide you through extracting the Elasticsearch package to the appropriate directory.


4.8.3 Register Windows Service

Register Elasticsearch Service

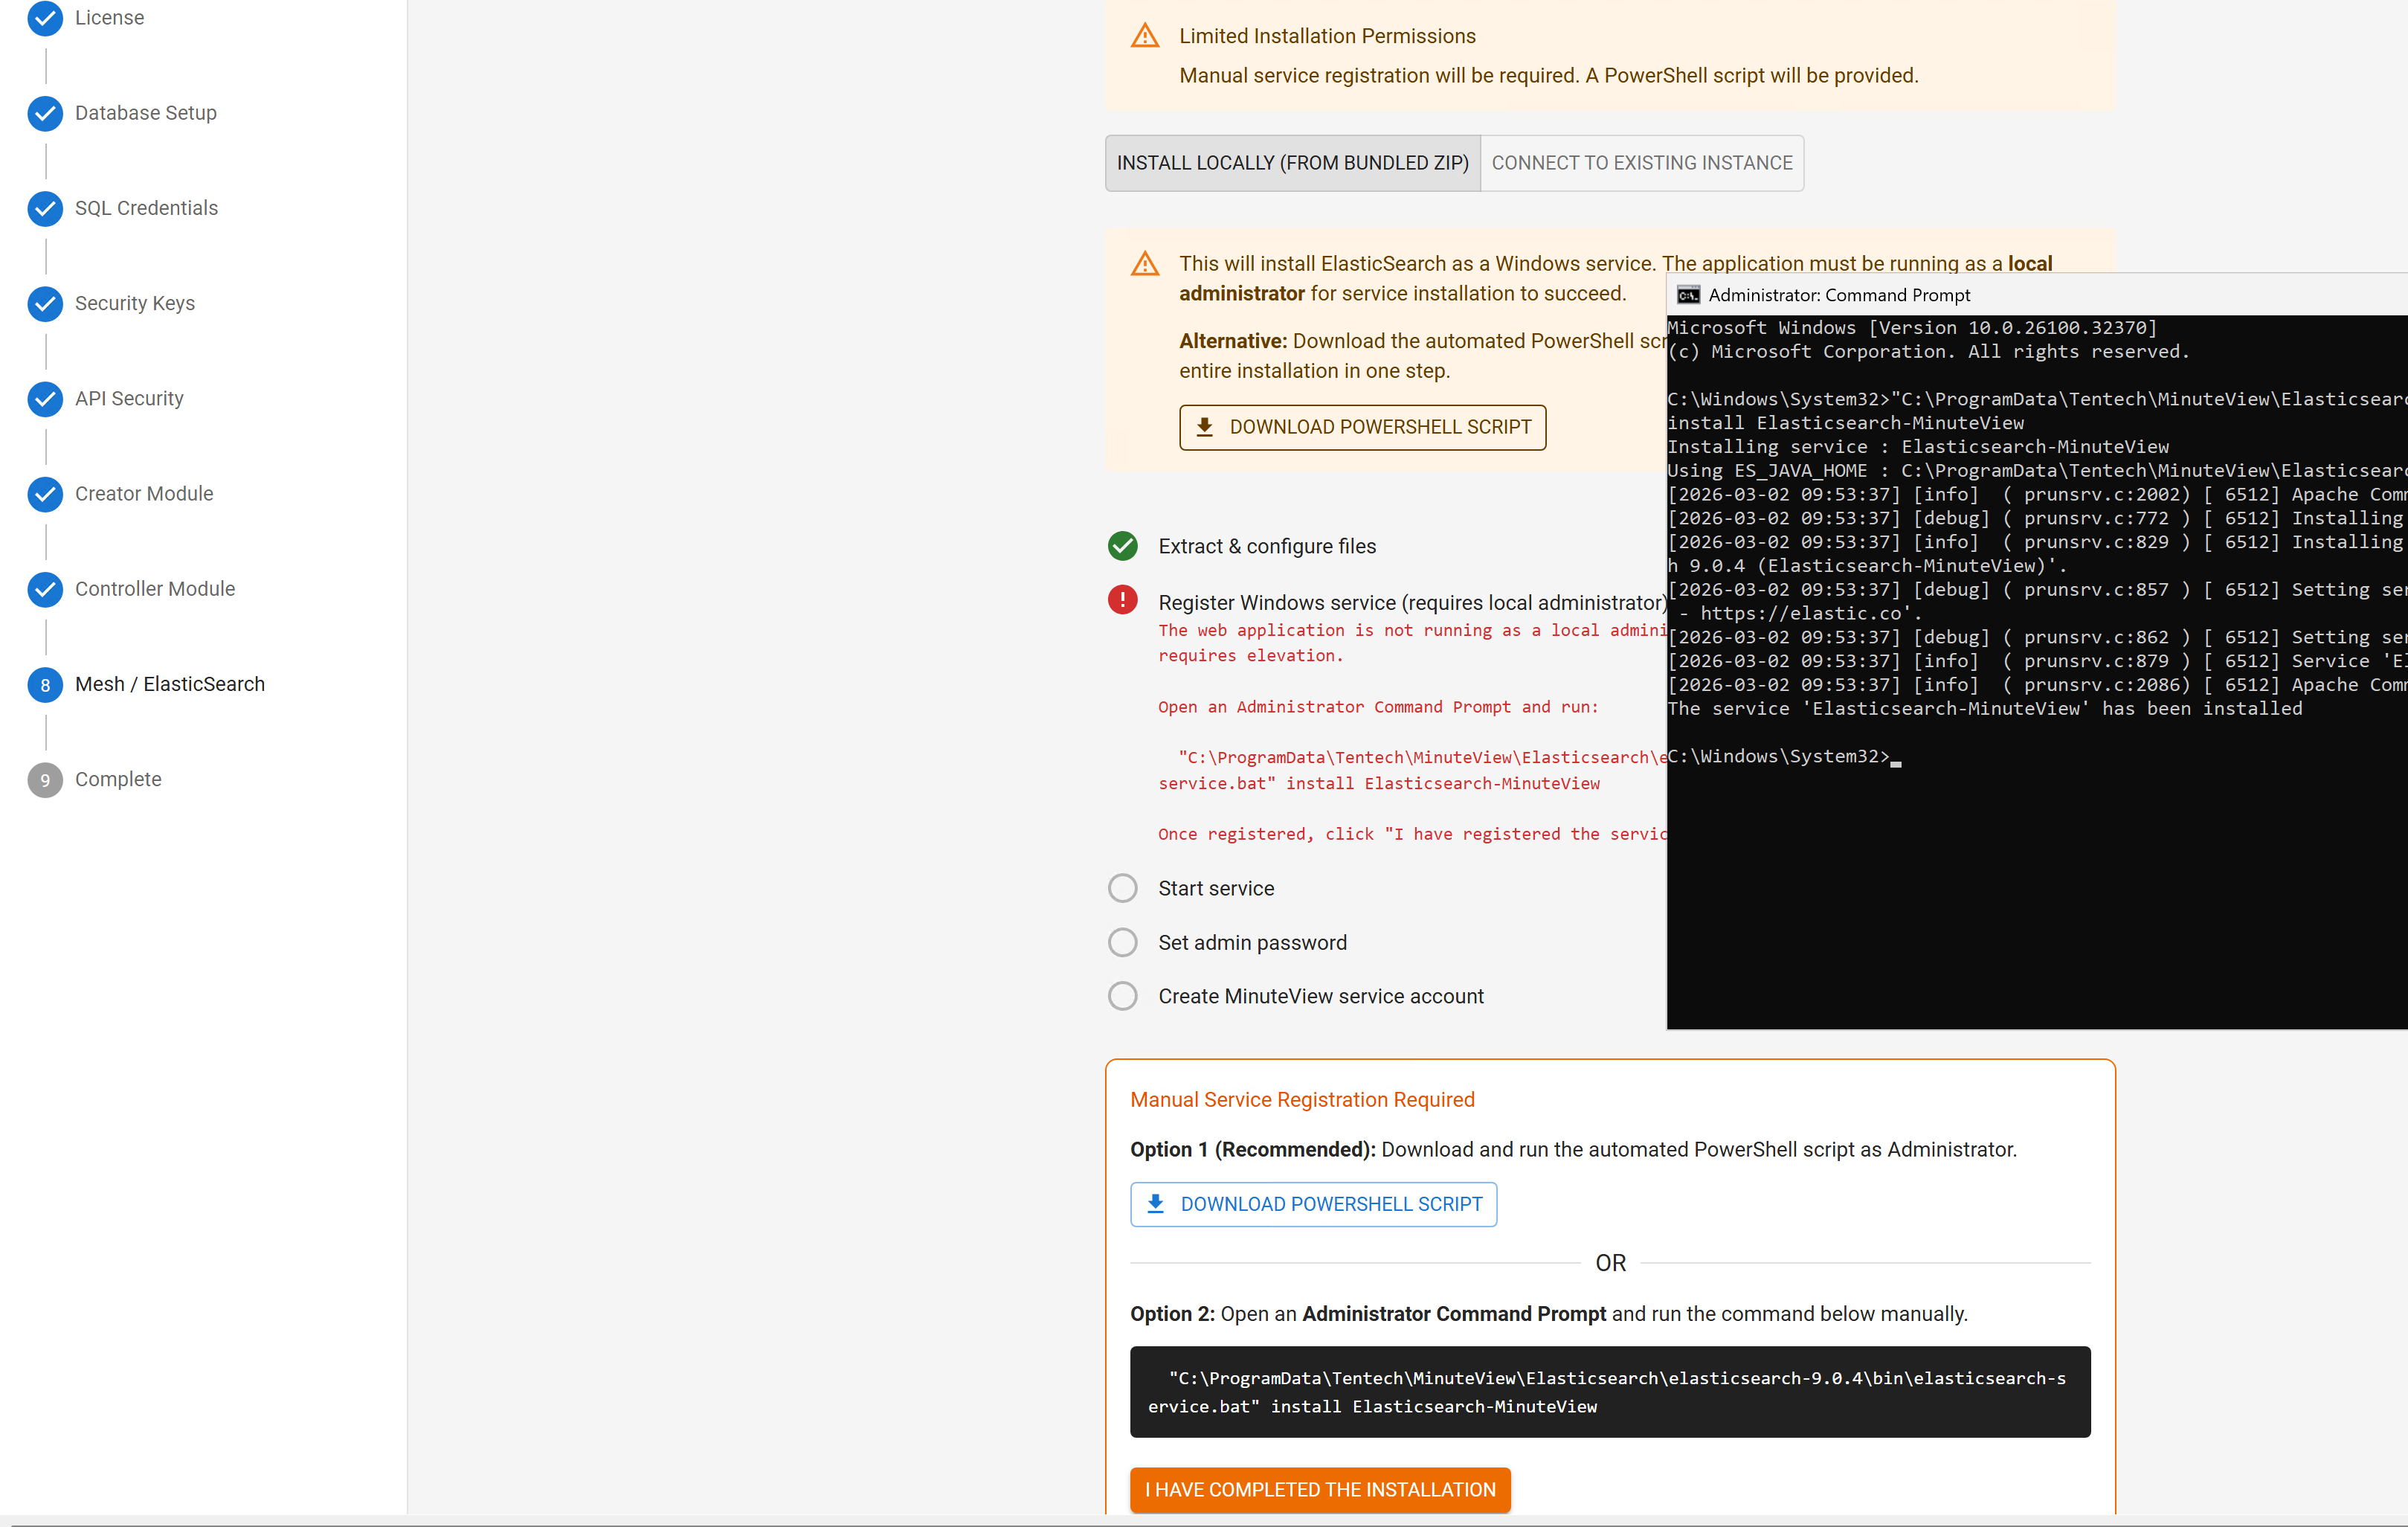
Follow the prompts to register Elasticsearch as a Windows Service.


4.8.4 Start the Service

Start Elasticsearch Service

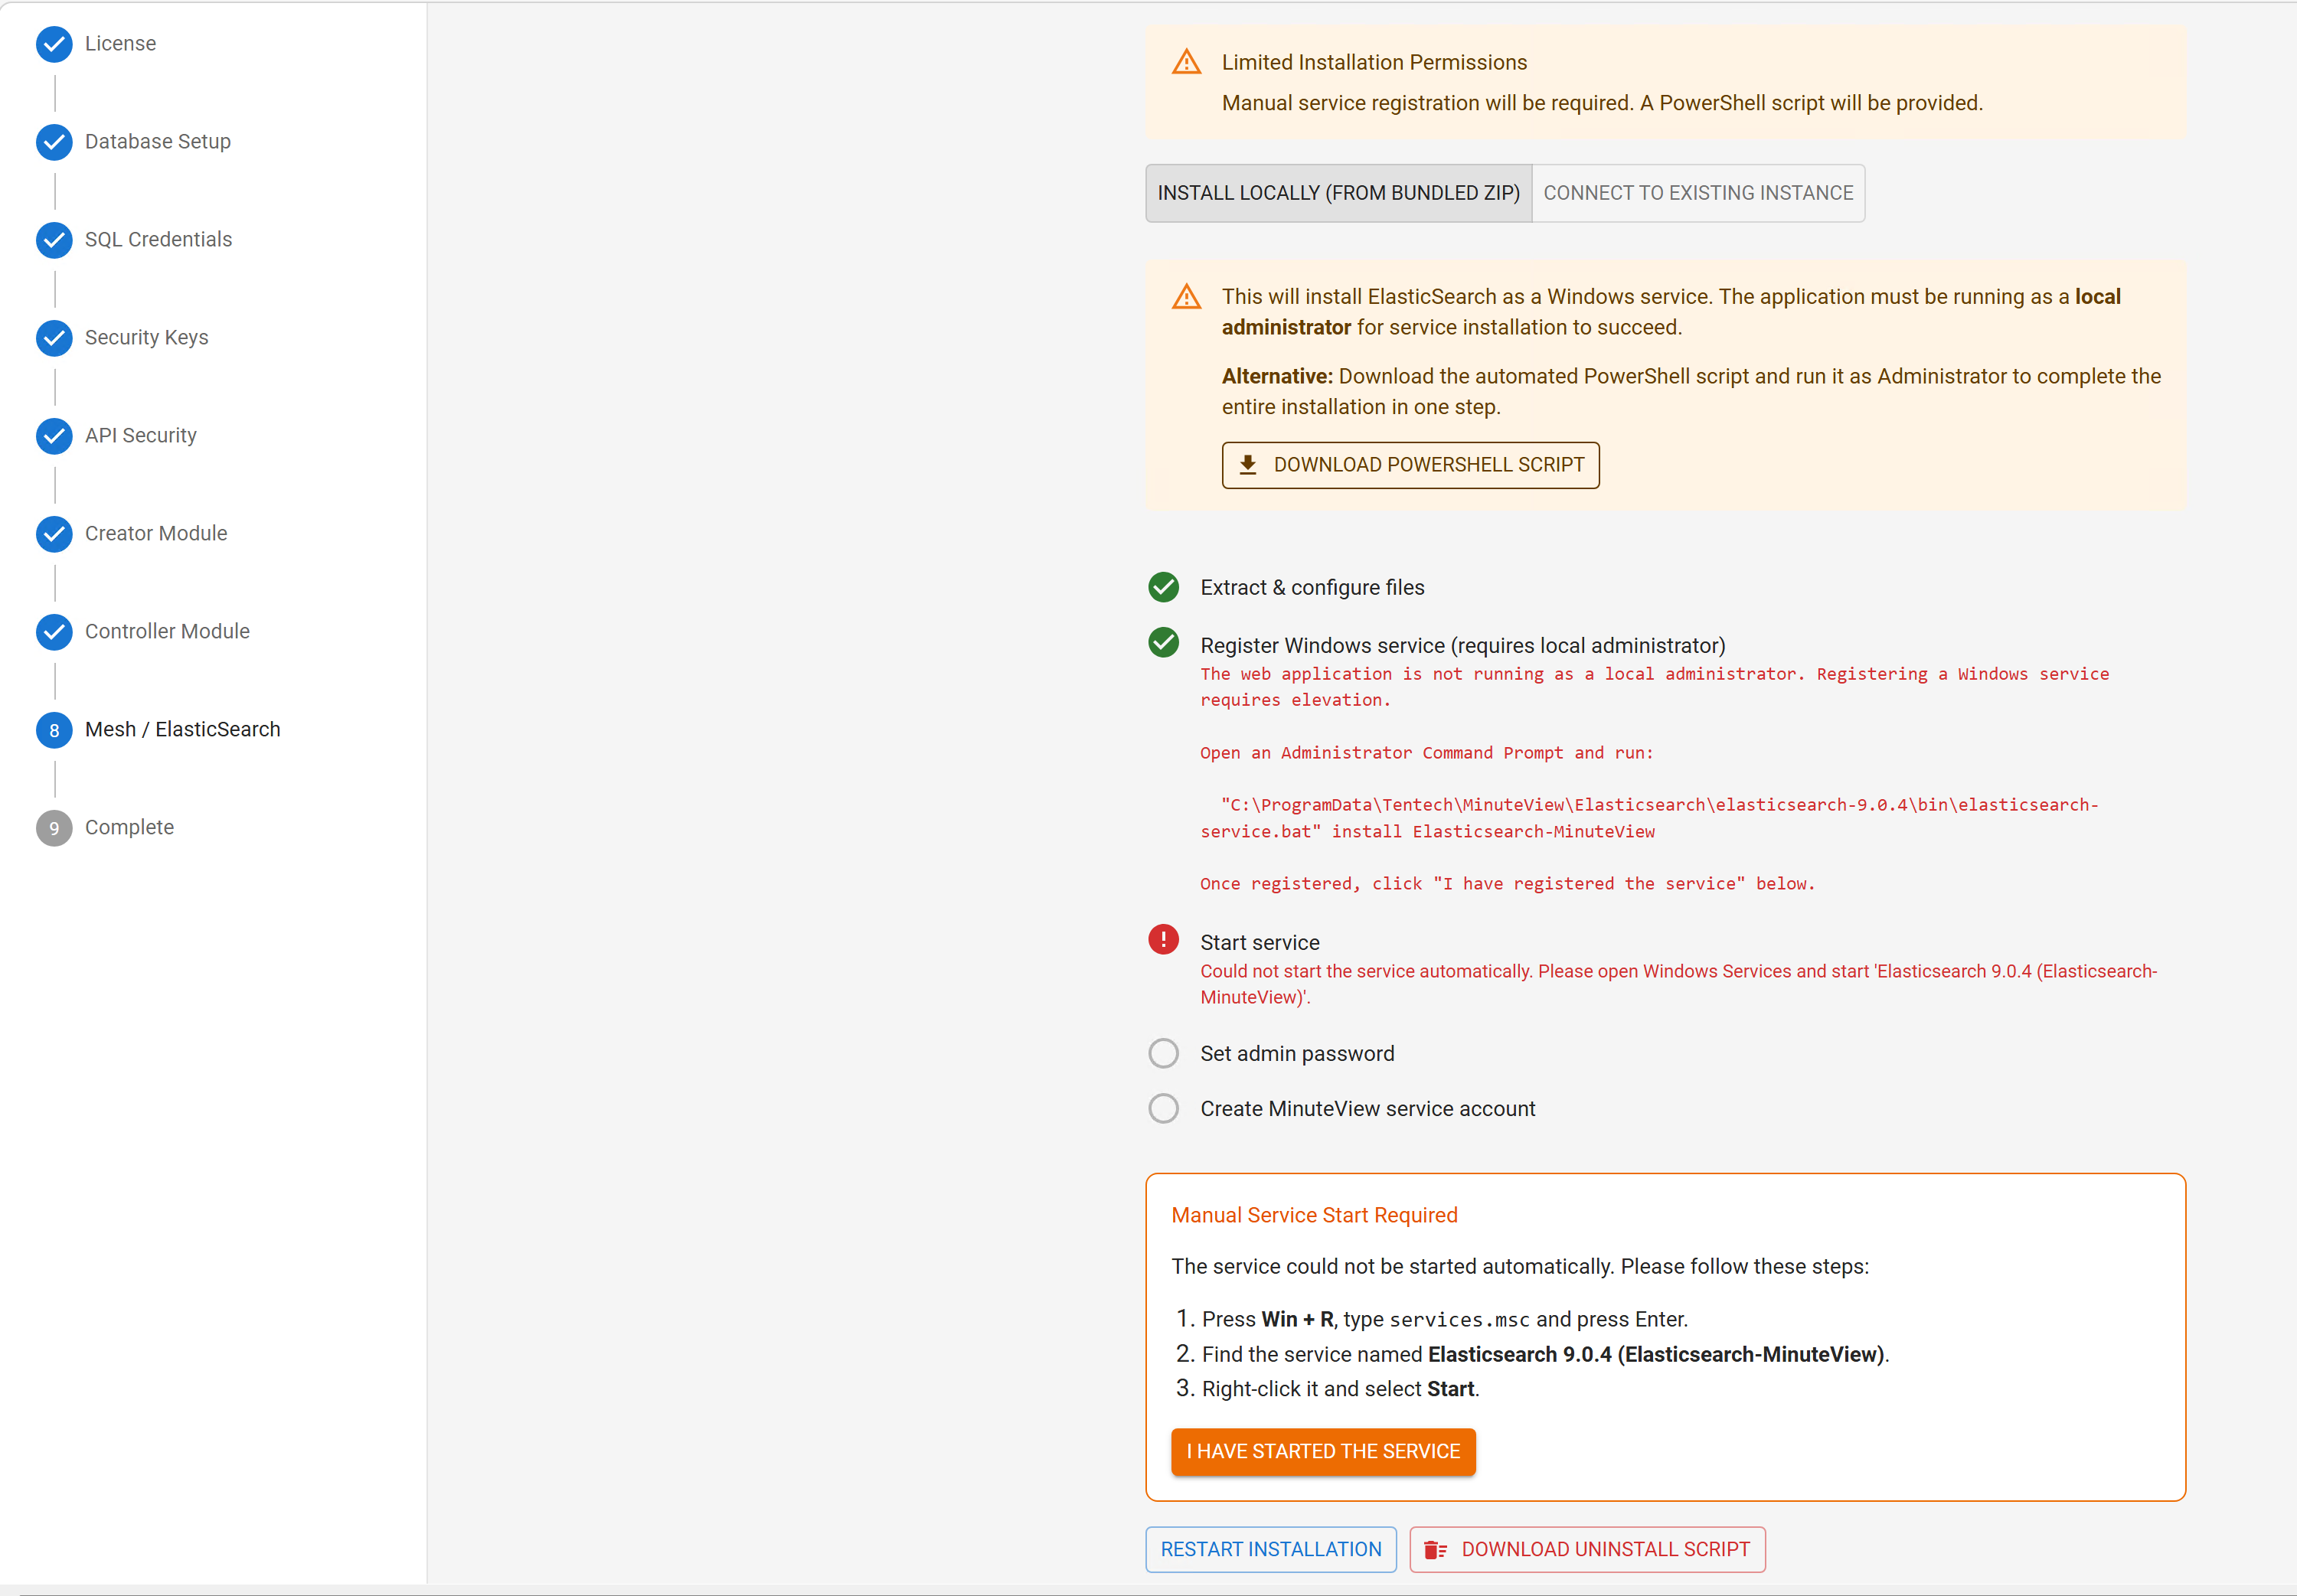
Start the Elasticsearch service via Windows Services or the wizard interface.
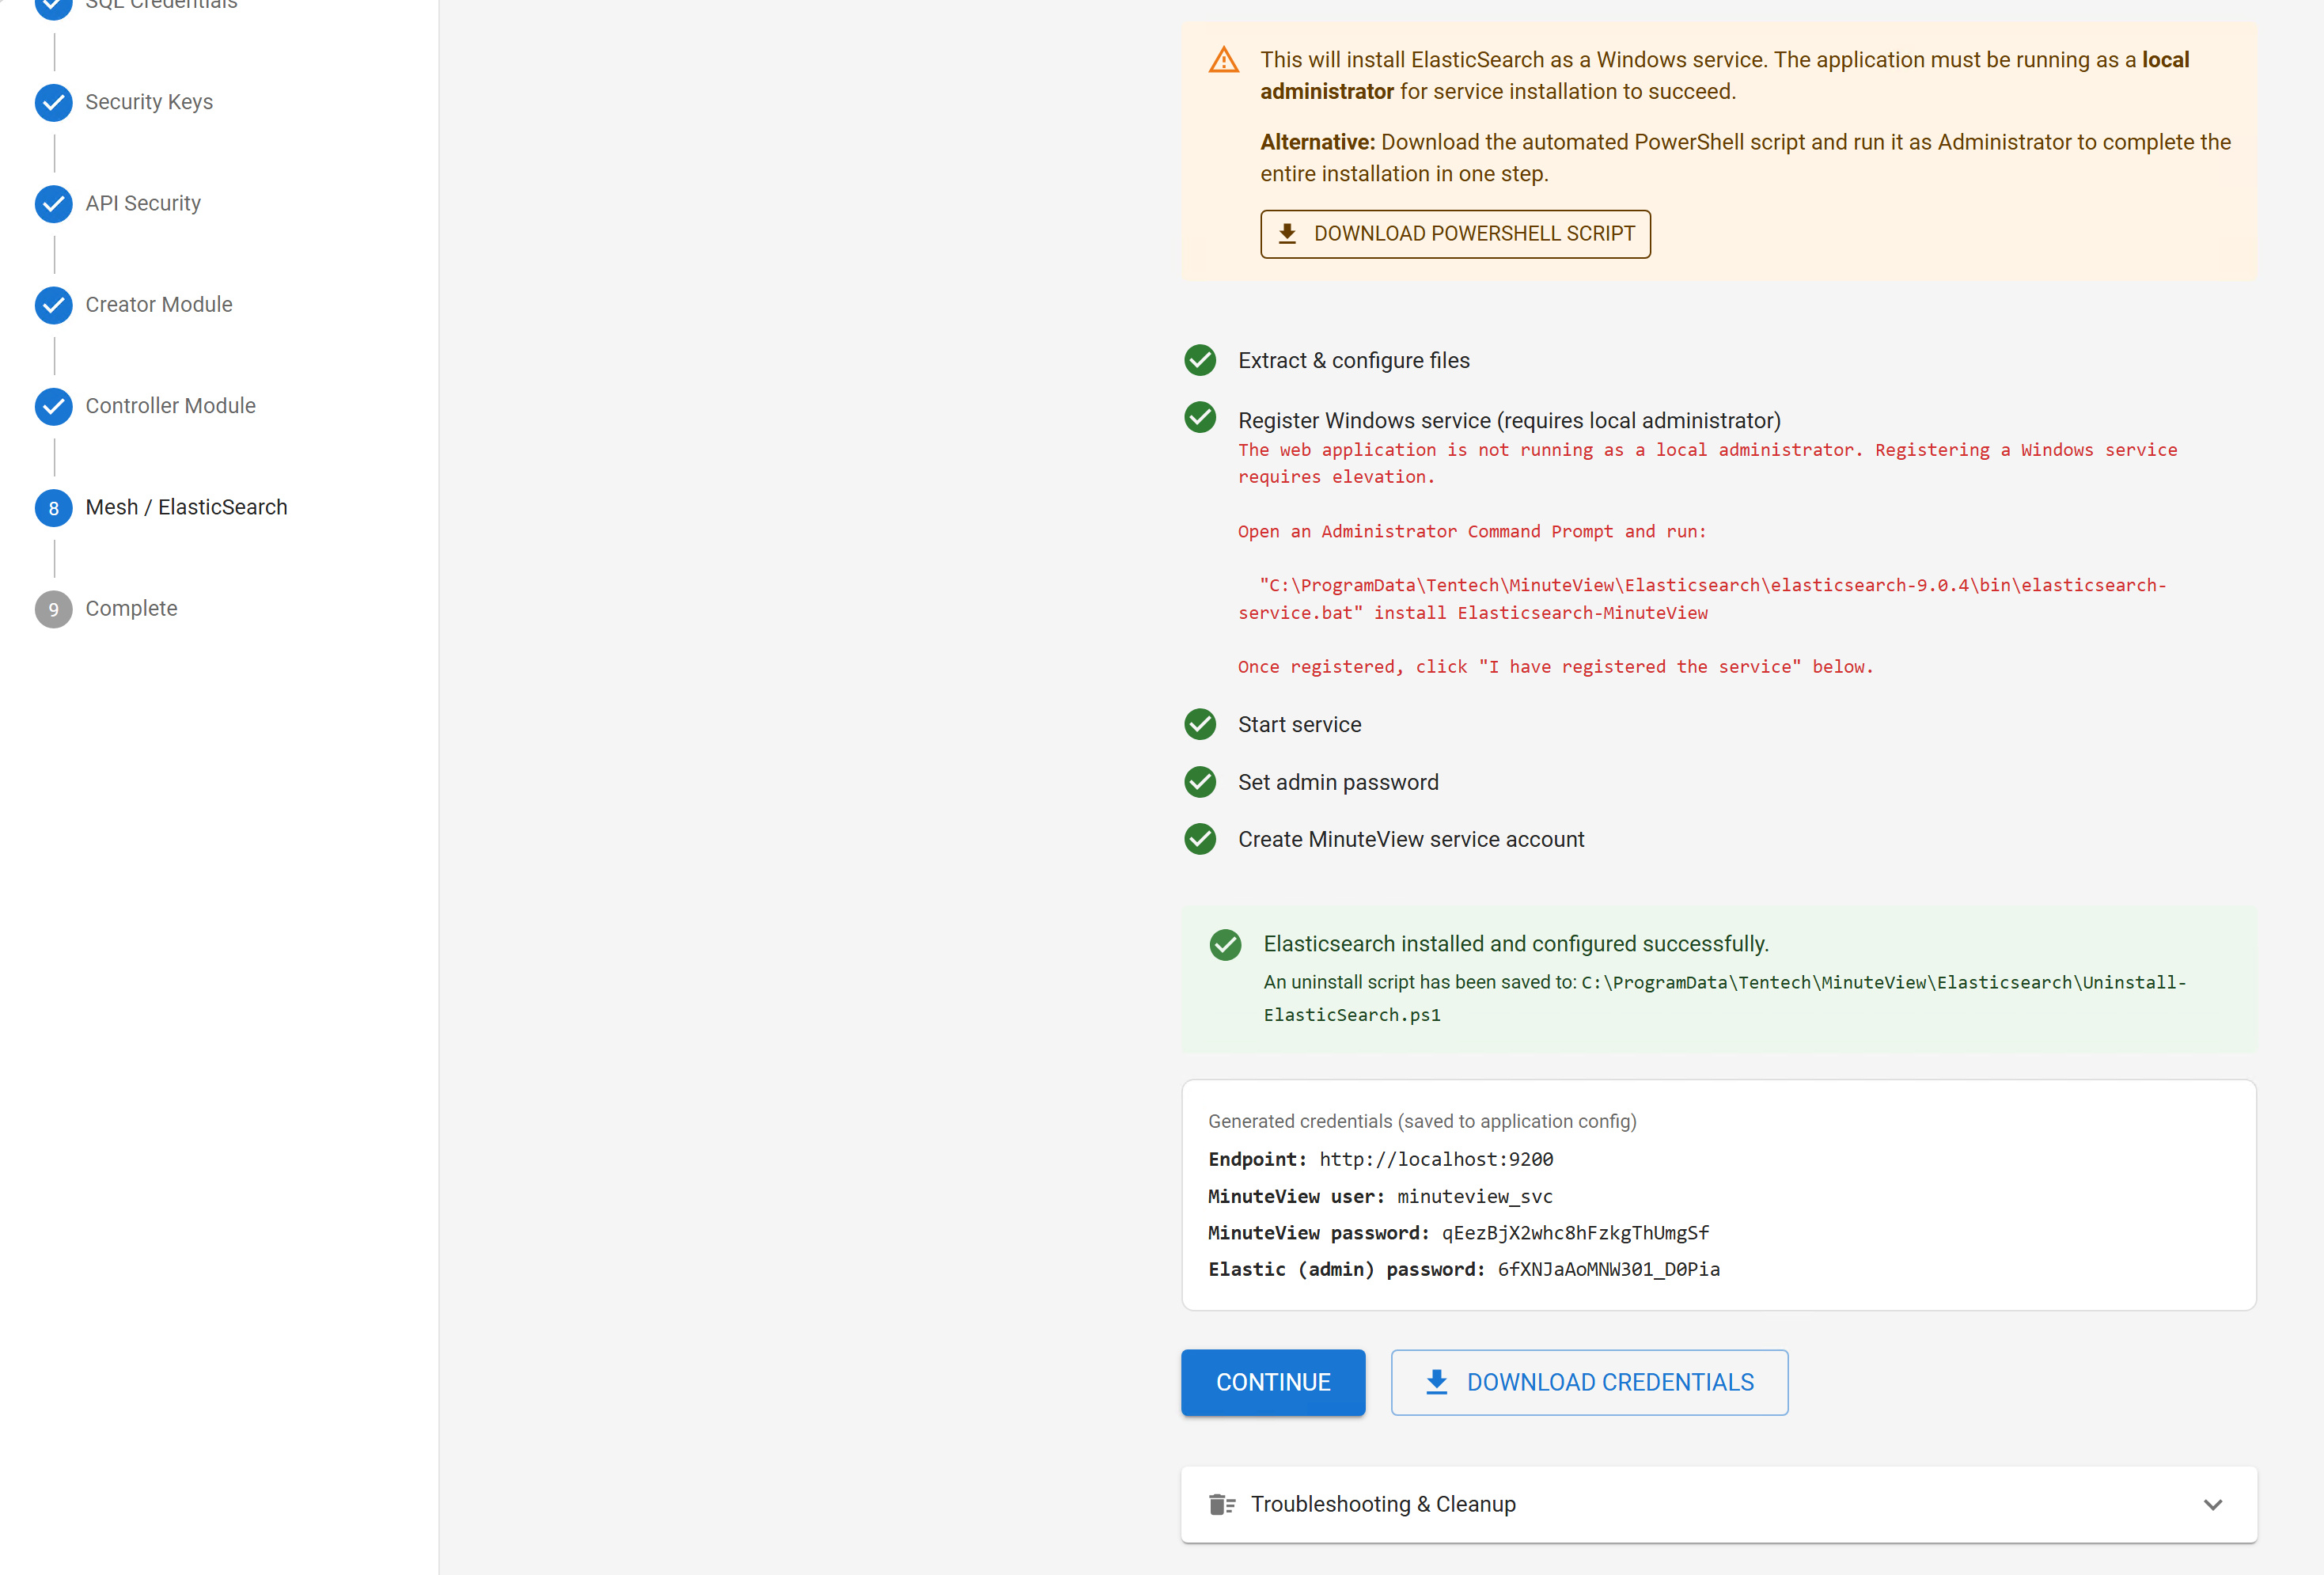

4.8.5 Credential Download

Save Elasticsearch Credentials

At completion:

  • You will be prompted to download the Elasticsearch credentials
  • Store these securely for future reference

Step 9 – Final Confirmation & Configuration Export

Save Configuration for Automations

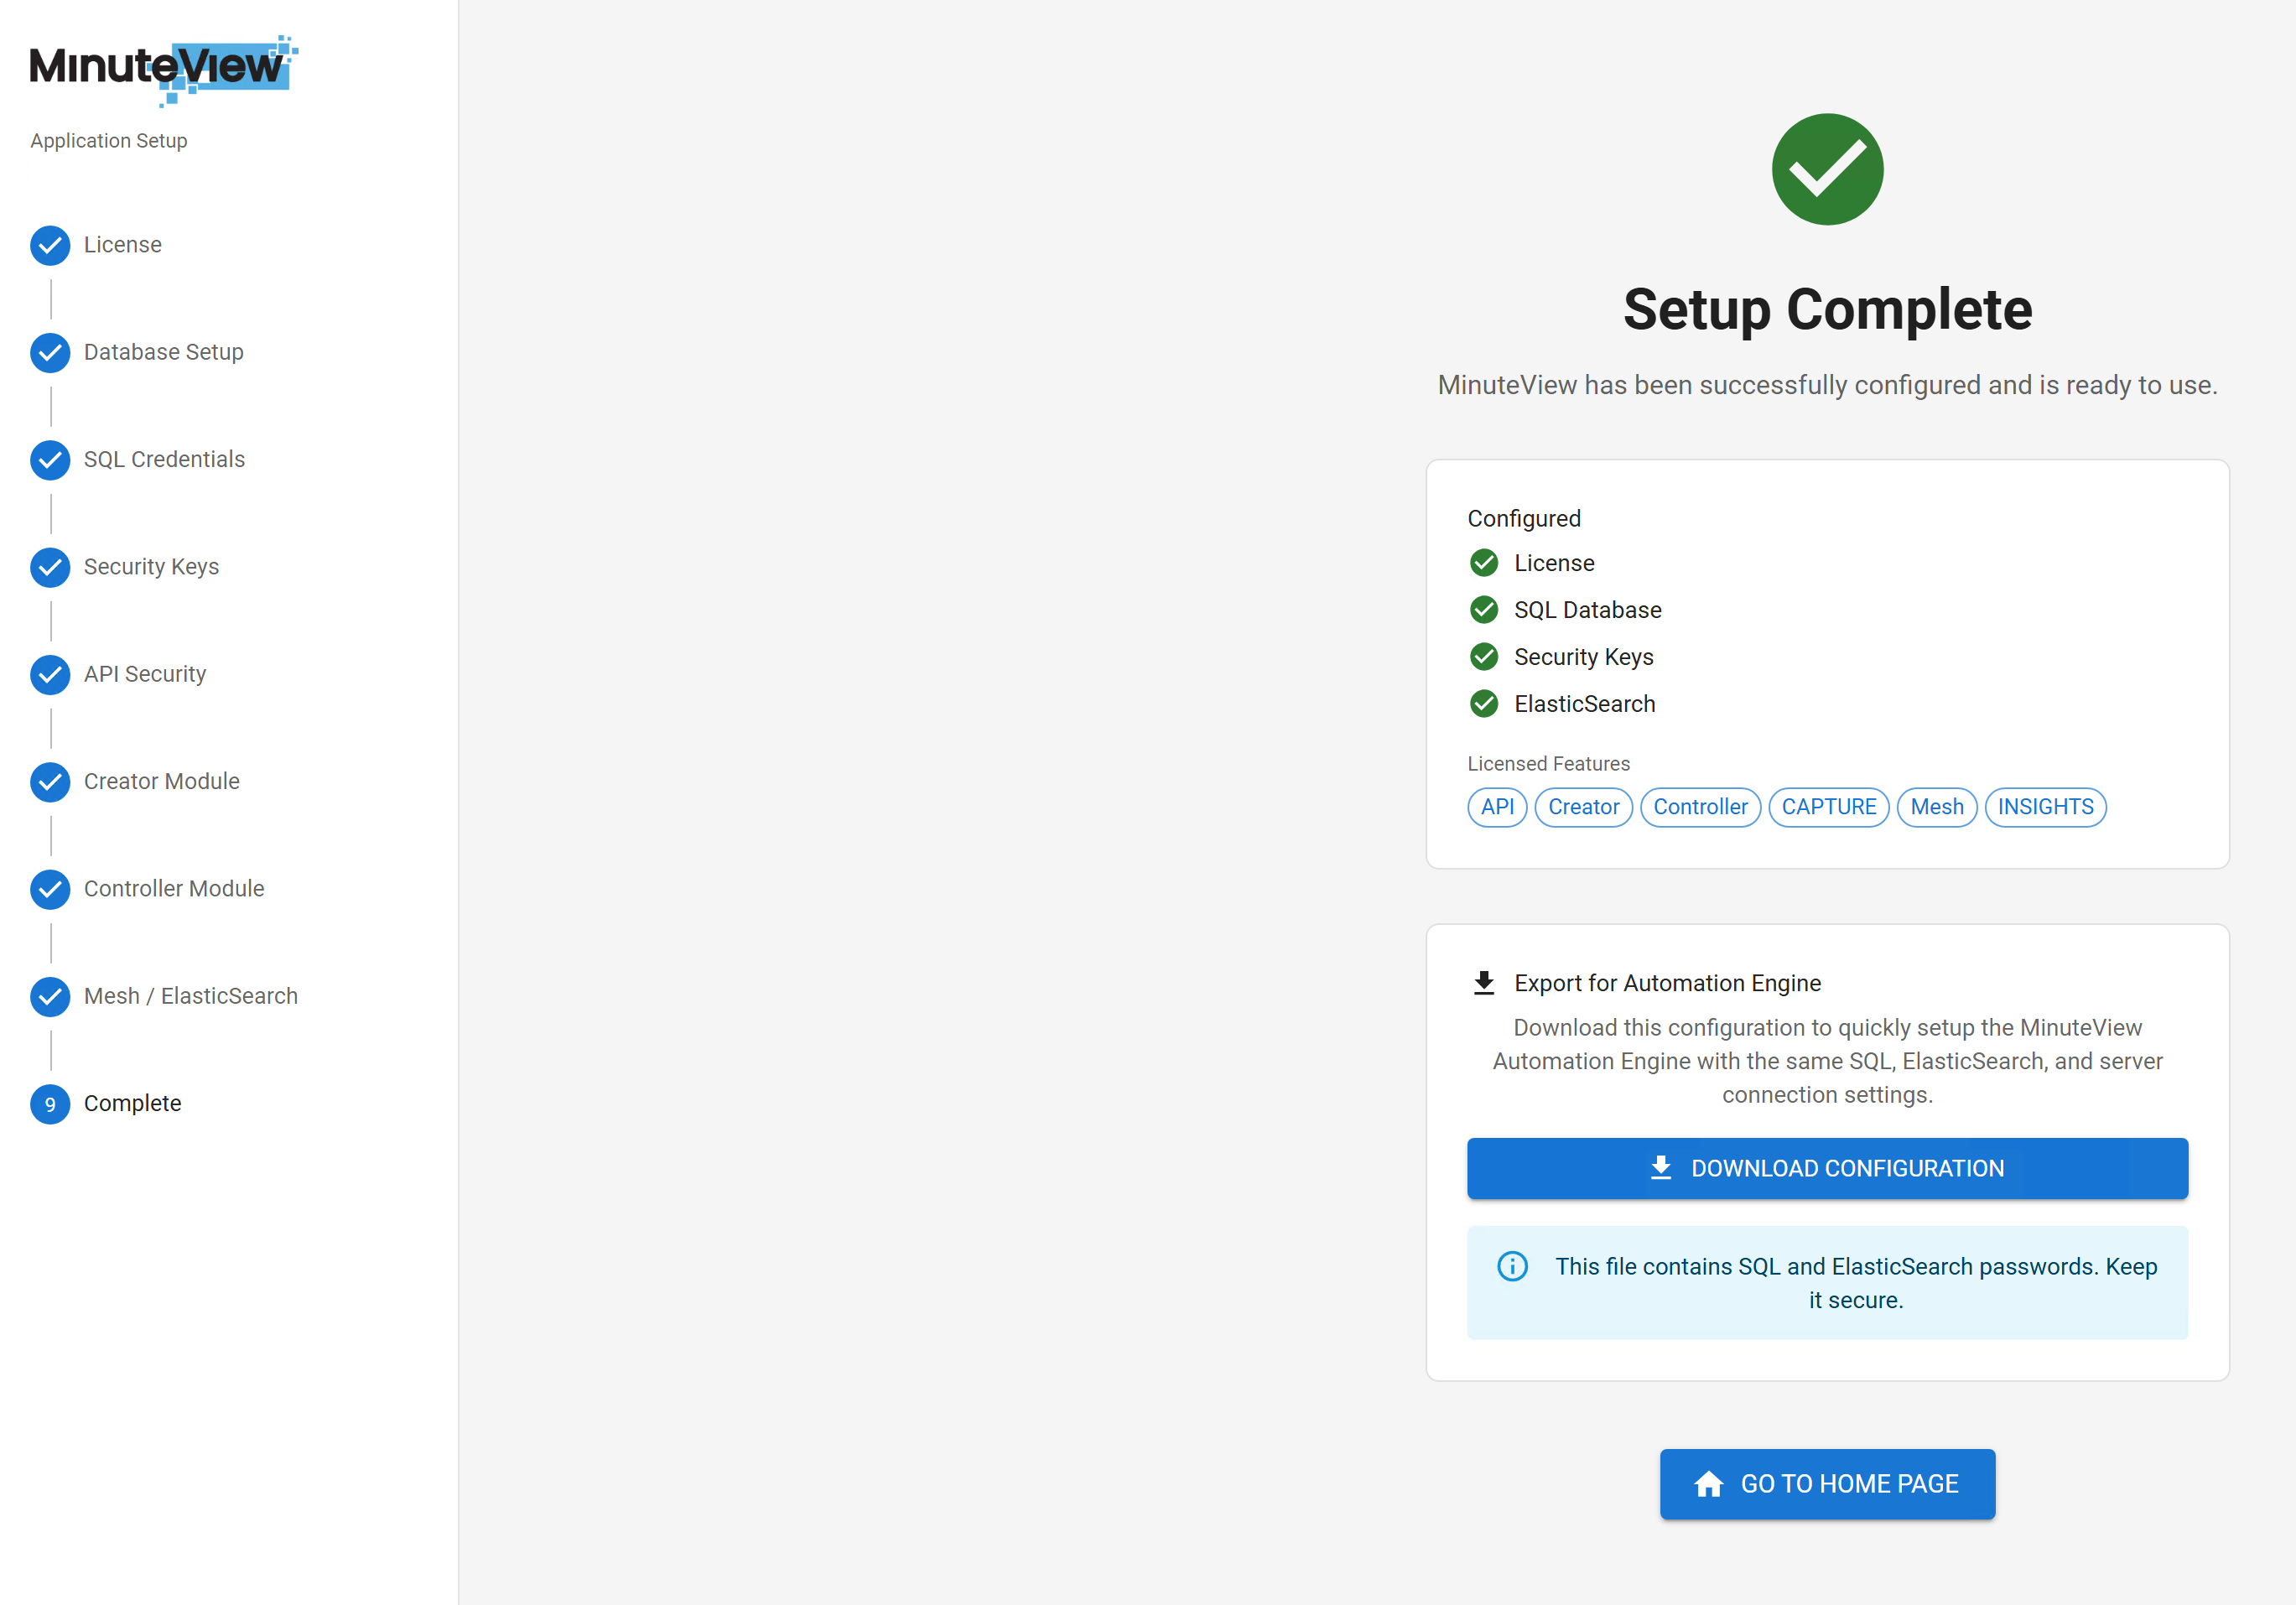
The final step confirms that:

  • License is valid
  • Database is initialized
  • Encryption keys are configured
  • API is enabled
  • Optional services are installed

You will be given a one-time opportunity to download your configuration file.

This configuration file:

  • Is required when installing the Automation Engine
  • Contains critical system configuration data

One-Time Download

This download may not be available again. Store it securely.


5. Post-Installation Verification

After completing the setup wizard, verify your installation:

5.1 Check IIS

  1. Open Internet Information Services (IIS) Manager
  2. Navigate to Default Web Site
  3. Verify the MinuteView application appears
  4. Ensure the application pool is running

5.2 Access MinuteView

  1. Navigate to: http://localhost/MinuteView
  2. You should see the MinuteView login page
  3. Use the default administrator credentials provided by Tentech

5.3 Verify Database

  1. Open SQL Server Management Studio
  2. Connect to your SQL Server instance
  3. Verify the MinuteView database exists
  4. Check that tables have been created

6. Security Recommendations

After installation, implement these security best practices:

6.1 Database Security

  • [ ] Disable the sa account if used during installation
  • [ ] Use a dedicated SQL account with minimum required permissions
  • [ ] Enable SQL Server auditing for the MinuteView database
  • [ ] Implement regular database backups

6.2 Application Security

  • [ ] Change default administrator password immediately
  • [ ] Store the Master Encryption Key in a secure location
  • [ ] Back up encryption keys separately from database backups
  • [ ] Enable HTTPS/SSL for production environments
  • [ ] Configure firewall rules to restrict access to MinuteView

6.3 IIS Security

  • [ ] Configure appropriate authentication methods
  • [ ] Set up SSL certificates for HTTPS
  • [ ] Review and configure application pool identity
  • [ ] Enable IIS logging for security auditing

7. Next Steps

After successful installation:


8. Troubleshooting

Installation Fails

Symptoms: Installer crashes or fails to complete

Solutions:

  • Ensure IIS is installed with all required features
  • Verify .NET Framework/hosting bundle is installed
  • Check Windows Event Viewer for error details
  • Run installer as Administrator

Cannot Access Setup Wizard

Symptoms: Browser shows 404 or 500 error

Solutions:

  • Verify IIS Default Web Site is running
  • Check application pool status in IIS Manager
  • Review IIS logs for errors
  • Ensure firewall allows HTTP/HTTPS traffic

Database Initialization Fails

Symptoms: SQL connection errors during Step 2

Solutions:

  • Verify SQL Server is running
  • Confirm SQL Authentication is enabled
  • Test SQL credentials using SQL Management Studio
  • Ensure SQL account has sysadmin or dbcreator role
  • Check SQL Server error logs

License Validation Fails

Symptoms: License file rejected during Step 1

Solutions:

  • Verify license file matches the machine fingerprint
  • Check license file is not corrupted
  • Ensure license has not expired
  • Contact Tentech for license verification

Configuration Backup

Remember to securely store:

  • Master Encryption Key
  • Configuration export file (from Step 9)
  • Elasticsearch credentials (if installed)

Tentech