

Skip to content

Markups & Annotations ​

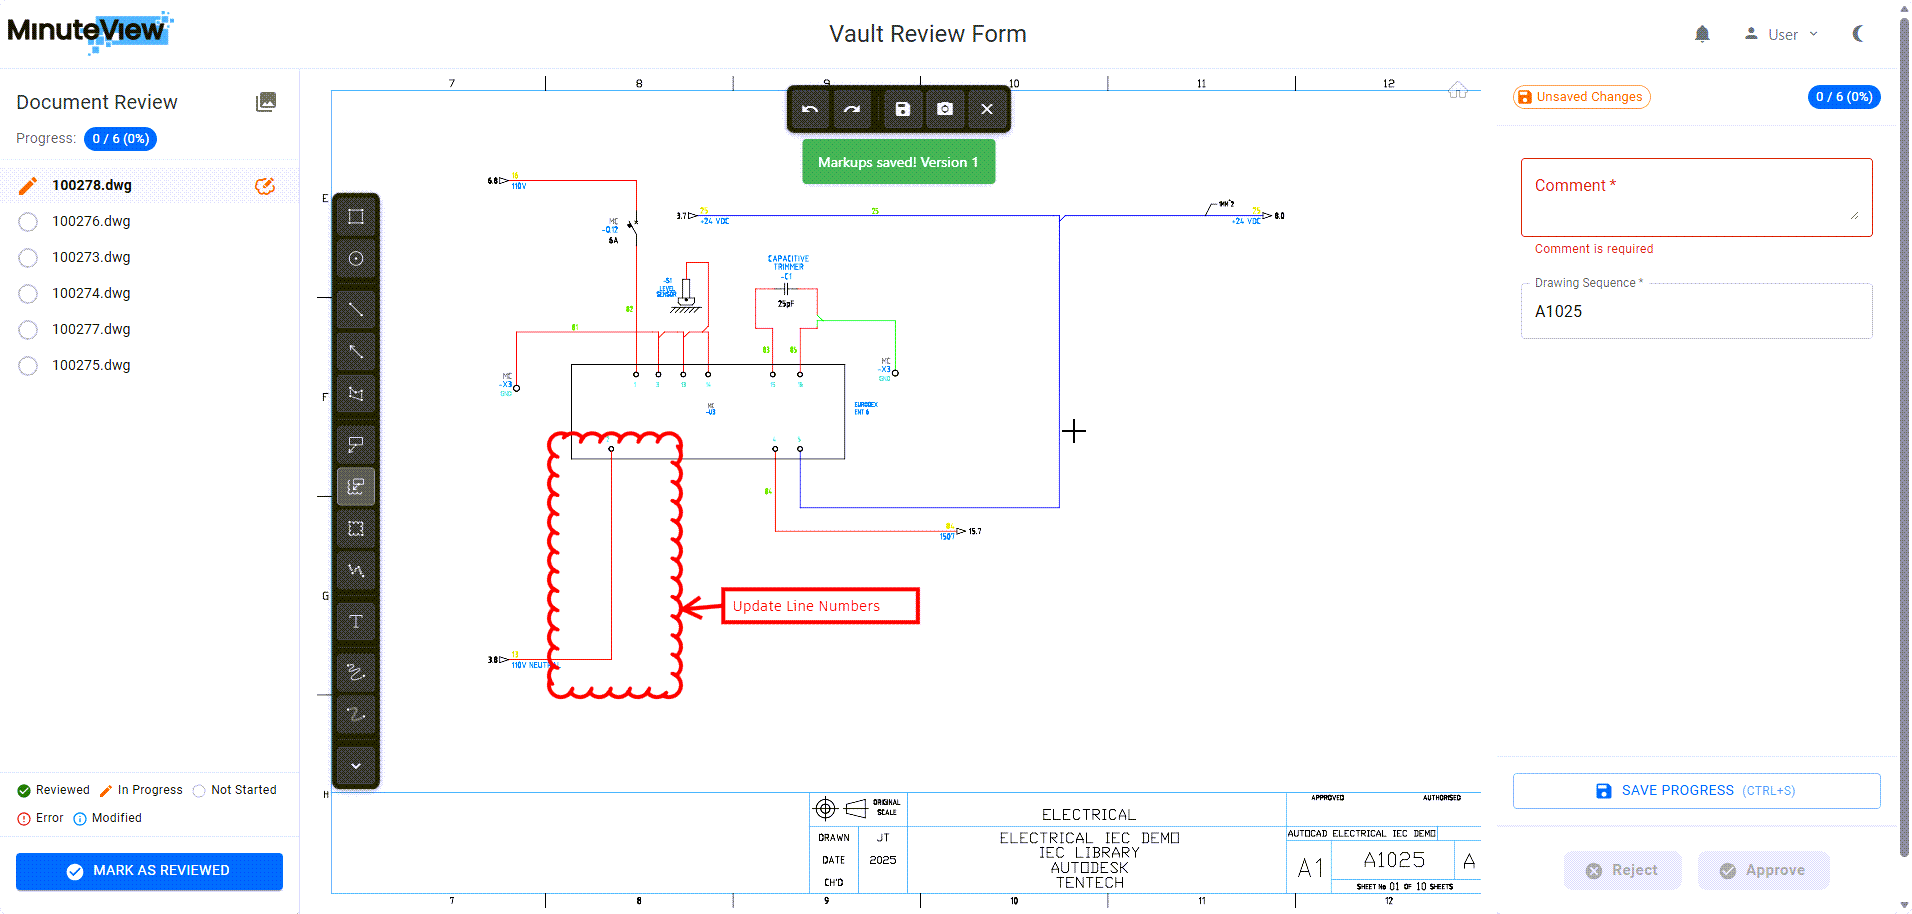
Markup Example

Overview ​

Markup tools allow you to add visual annotations directly on drawings and documents. Markups provide clear, unambiguous feedback that's easier to understand than text descriptions alone.


Accessing Markup Tools ​

Toolbar Location ​

Markup tools are located in the review environment toolbar:

  • Top of screen (most common)
  • Left side panel
  • Floating toolbar (some configurations)

Tool Visibility ​

Tools display when:

  • Viewing a markup-supported artifact (DWG, PDF, etc.)
  • In review mode
  • User has permission to add markups

Available Markup Tools ​

Freehand Pen ​

Purpose: Draw freehand lines and shapes

Use for:

  • Circling areas
  • Drawing arrows
  • Underlining text
  • Custom shapes

How to use:

  1. Select pen tool
  2. Choose color (if supported)
  3. Click and drag to draw
  4. Release to complete

Shapes ​

Rectangle:

  • Box around areas
  • Highlighting sections
  • Boundary indicators

Circle/Ellipse:

  • Circling items
  • Highlighting points
  • Area indicators

Arrow:

  • Pointing to specific items
  • Direction indicators
  • Attention markers

Line:

  • Connecting points
  • Dimension indicators
  • Reference lines

How to use:

  1. Select shape tool
  2. Click start point
  3. Drag to end point
  4. Release to complete

Text Annotation ​

Purpose: Add text notes directly on artifacts

Use for:

  • Explanatory notes
  • Callouts
  • Labels
  • Detailed comments

How to use:

  1. Select text tool
  2. Click placement location
  3. Type your text
  4. Click outside to finish

Best practices:

  • Keep text concise
  • Use clear font size
  • Position for readability
  • Avoid covering important details

Highlight ​

Purpose: Highlight text or areas with semi-transparent color

Use for:

  • Emphasizing text
  • Marking sections
  • Color-coding issues

How to use:

  1. Select highlight tool
  2. Choose color
  3. Drag over area to highlight
  4. Release to apply

Cloud/Revision Cloud ​

Purpose: Traditional revision cloud marking

Use for:

  • Marking change areas
  • Indicating revisions needed
  • Standard engineering markup

How to use:

  1. Select cloud tool
  2. Click points to define cloud boundary
  3. Double-click or click start to close
  4. Cloud automatically forms around points

Measurement (If Available) ​

Purpose: Measure distances or areas on drawings

Use for:

  • Verifying dimensions
  • Checking spacing
  • Area calculations

How to use:

  1. Select measurement tool
  2. Click start point
  3. Click end point
  4. Measurement displays

Stamp (If Available) ​

Purpose: Add predefined stamps

Common stamps:

  • Approved
  • Rejected
  • Reviewed
  • For Information
  • Confidential

How to use:

  1. Select stamp tool
  2. Choose stamp type
  3. Click to place on artifact

Markup Properties ​

Color ​

Most tools support color selection:

  • Red: Issues, problems, rejections
  • Green: Approvals, good
  • Yellow/Orange: Warnings, questions
  • Blue: Information, notes
  • Black: General markup

Color best practices:

  • Use consistent color coding
  • Red for required changes
  • Yellow for suggestions
  • Green for approval indicators

Line Weight/Thickness ​

Adjust line thickness:

  • Thin: Detailed markup
  • Medium: Standard use
  • Thick: Emphasis, visibility

Transparency ​

Some tools support transparency:

  • Full opacity: Maximum visibility
  • Semi-transparent: Show underlying content
  • Adjust based on need

Working with Markups ​

Selecting Markups ​

Click any markup to select it:

  • Selection handles appear
  • Properties editable
  • Can move, resize, or delete

Moving Markups ​

  1. Select markup
  2. Drag to new location
  3. Release to place

Resizing Markups ​

  1. Select markup
  2. Drag corner/edge handles
  3. Release when sized correctly

Deleting Markups ​

Options:

  • Select and press Delete key
  • Right-click → Delete
  • Use eraser tool

Editing Markups ​

  1. Select markup
  2. Modify properties (color, size, etc.)
  3. Edit text (for text annotations)
  4. Changes apply immediately

Undo and Redo ​

Undo Last Markup ​

Keyboard: Ctrl + Z (or Cmd + Z on Mac)

Button: Undo button in toolbar

Effect: Removes last markup action

Redo ​

Keyboard: Ctrl + Y (or Cmd + Y on Mac)

Button: Redo button in toolbar

Effect: Restores undone action

Multiple Undo ​

  • Most systems support multiple undo levels
  • Continue pressing Ctrl+Z to undo further back
  • History depth varies by implementation

Markup Best Practices ​

Clarity ​

  • ✅ Be specific about location
  • ✅ Use clear, legible annotations
  • ✅ Don't obscure important information
  • ✅ Use appropriate tool for the task

Consistency ​

  • ✅ Use consistent colors for similar issues
  • ✅ Similar line weights
  • ✅ Consistent annotation style
  • ✅ Standard terminology

Completeness ​

  • ✅ Mark all issues found
  • ✅ Don't assume submitter will understand
  • ✅ Be thorough but not excessive
  • ✅ Supplement with text comments if needed

Professionalism ​

  • ✅ Use professional language
  • ✅ Avoid emoji or casual text
  • ✅ Be constructive, not critical
  • ✅ Focus on actionable feedback

Common Markup Scenarios ​

Indicating a Change Needed ​

Approach:

  1. Use revision cloud around area
  2. Add text annotation explaining change
  3. Use red color for visibility
  4. Add arrow pointing to specific item

Example: Cloud the dimension, add text "Change to 25.5mm"


Approving a Section ​

Approach:

  1. Add green checkmark or circle
  2. Add text "Approved" or "OK"
  3. Use stamp if available

Example: Green circle with "Approved - JT"


Asking a Question ​

Approach:

  1. Use yellow/orange color
  2. Add text annotation with question
  3. Circle or arrow to specific item

Example: Yellow text "Is this material correct?"


Marking Multiple Issues ​

Approach:

  1. Number each issue
  2. Add corresponding text annotations
  3. Use consistent colors
  4. Provide clear descriptions

Example:

  • Red cloud "1"
  • Text "1. Dimension incorrect, should be 15mm"

Markup Persistence ​

Saving Markups ​

Automatic save:

  • Most systems auto-save markups
  • Saved when capture completed
  • Persist in capture record

Manual save (if supported):

  • Save button to manually persist
  • Ensure markups saved before closing

Viewing Historical Markups ​

  • Previous markups visible in timeline
  • Can view markup history
  • See who added which markups
  • Timestamp on markups

Markup Ownership ​

  • Markups associated with user who created them
  • Visible to all who can view capture
  • May support editing own markups only

Advanced Markup Features ​

Layering ​

If supported:

  • Multiple markup layers
  • Show/hide layers
  • Organize by reviewer or type

Comparison Markups ​

When comparing versions:

  • Automatic difference highlighting
  • Manual comparison markups
  • Color-coded changes

Collaborative Markups ​

Multiple reviewers:

  • Each reviewer's markups in different color
  • View by reviewer filter
  • Combine feedback from multiple sources

Troubleshooting ​

Markup Tools Not Available ​

Check:

  • Are you viewing supported file type?
  • Do you have permission to add markups?
  • Is artifact loaded correctly?
  • Try refreshing page

Markups Not Saving ​

Check:

  • Network connection
  • Browser compatibility
  • Complete capture action (don't just close)
  • Check browser console for errors

Can't Select/Edit Markups ​

Check:

  • Are they your markups? (may only edit own)
  • Is capture still editable?
  • Try clicking directly on markup
  • Use selection tool if available

Markups Not Visible ​

Check:

  • Markup layer visibility toggled off?
  • Zoom level appropriate?
  • Color contrast with background?
  • Refresh artifact view

Tips for Effective Markup ​

Combine with Comments ​

  • Use markups for specific visual feedback
  • Use comments for overall observations
  • Reference markup locations in comments
  • Provide complete feedback package

Think About the Recipient ​

  • Will they understand your markup?
  • Is it clear what action is needed?
  • Have you provided enough context?
  • Is feedback constructive?

Review Your Markups ​

Before completing capture:

  • Review all markups added
  • Ensure they're clear and accurate
  • Check for completeness
  • Verify all issues marked

Next Steps ​

After adding markups:

Tentech